Twitter Bootstrap navbar tutorial
Introduction
Using Twitter Bootstrap, you may create static navbar. In this tutorial, you will see how to do that.
Note: An example of Navbar with Twitter Bootstrap 3 is added. You may have a live demo here and may download the zip file containing dist folder downloaded from Bootstrap's website containing css, js and fonts folder and navbar-example.html file. To run it from your own setup without making any changes in the paths, Keep dist folder and the example html file in the same folder.
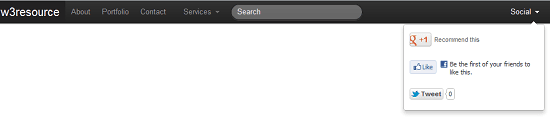
We will take an HTML5 page with content and see how to add a top navigation bar into it. Here is the final product :
And Here is the HTML5 code of the page without any content.
<!DOCTYPE html>
  <html lang="en">
  <head>
  <meta charset="utf-8">
  <title>Twitter Bootstrap Basic Tab Based Navigation Example</title>
  <meta name="description" content="Twitter Bootstrap Basic Tab Based Navigation Example">
  <link href="/twitter-bootstrap/twitter-bootstrap-v2/docs/assets/css/bootstrap.css" rel="stylesheet">
  </head>
  <body>
  <!-- We will create navbar here -->
  </body>
  </html>
To create the basic structure to contain the navigations, you may insert the following code right after the <body> tag into the HTML5 code shown above:
<div class="navbar navbar-fixed-top">
  <div class="navbar-inner">
    <div class="container">
	<!--navigation does here-->
    </div>
  </div>
</div>
Now, let's replace the <!--navigation does here--> with the following code to create the first set of navigations. Note that there is a "brand" class which is rendered in a different way, this may be used to render your company's / organization's name.
<ul class="nav">
  <li class="active">
    <a class="brand" href="#">w3resource</a>
  </li>
  <li><a href="#">About</a></li>
  <li><a href="#">Portfolio</a></li>
  <li><a href="#">Contact</a></li>
</ul>
Help us to serve you with Better content.
Wish to create a dropdown menu now? For that, you may insert the following code right after the HTML code shown in the last code block.
<ul class="nav">
  <li class="dropdown">
    <a href="#"
          class="dropdown-toggle"
          data-toggle="dropdown">
          Services
          <b class="caret"></b>
    </a>
    <ul class="dropdown-menu">
     <li><a href="#">Web Design</a></li>
  <li><a href="#">Web development</a></li>
  <li><a href="#">Wordpress Theme development</a></li>
    </ul>
  </li>
</ul>
But, since Twitter Bootstrap Dropdown takes help of JavaScript, so you need to insert following two lines of codes into the HTML page. You may insert them right before the </body> tag.
<script src="twitter-bootstrap-v2/docs/assets/js/jquery.js"></script>
<script src="twitter-bootstrap-v2/docs/assets/js/bootstrap-dropdown.js"></script>
For inserting a search form into the navbar, right after the <ul> containing the dropdown list, insert the following code. Note that, class "pull-left" is to left align the search form. If you wish to align that right, you may use "pull-right" class.
<form class="navbar-search pull-left">
  <input type="text" class="search-query" placeholder="Search">
</form>
Now we want to insert social buttons into the navbar. And we want to place it at the right most part of the navbar. We are going to insert Google Plus, Facebook Like, and Tweet buttons. You may insert the following code right after the code for the search form.
<ul class="nav pull-right">
  <li class="dropdown">
    <a href="#"
          class="dropdown-toggle"
          data-toggle="dropdown">
          Social
          <b class="caret"></b>
    </a>
    <ul class="dropdown-menu">
     <li class="socials"><!-- Place this tag where you want the +1 button to render -->
<g:plusone annotation="inline" width="150"></g:plusone>
</li>
  <li class="socials"><div class="fb-like" data-send="false" data-width="150" data-show-faces="true"></div></li>
  <li class="socials"><a href="https://twitter.com/share" class="twitter-share-button">Tweet</a>
<script>!function(d,s,id){var js,fjs=d.getElementsByTagName(s)[0];if(!d.getElementById(id)){js=d.createElement(s);js.id=id;js.src="//platform.twitter.com/widgets.js";fjs.parentNode.insertBefore(js,fjs);}}(document,"script","twitter-wjs");</script></li>
    </ul>
  </li>
</ul>
class "socials" is not part of the bootstrap.css. Since we want all the social buttons to be aligned center, so we created a little bit of padding around it with it. Here is it:
.socials {
padding: 10px;
}
You may keep that wrapped within <style type="text/css"> and </style>in the page itself or may add it through an external CSS file.
And finally, you need to insert two more blocks of code. One for the Facebook button and another for the Google Plus. These are supplied by the Facebook and Google for inserting buttons dynamically into your page.
So, insert this just after your body tag opens. This is for Facebook
<div id="fb-root"></div>
<script>(function(d, s, id) {
  var js, fjs = d.getElementsByTagName(s)[0];
  if (d.getElementById(id)) return;
  js = d.createElement(s); js.id = id;
  js.src = "//connect.facebook.net/en_GB/all.js#xfbml=1";
  fjs.parentNode.insertBefore(js, fjs);
}(document, 'script', 'facebook-jssdk'));</script>
And then this one, just before you body tag closes,for Google Plus
<script type="text/javascript">
  (function() {
    var po = document.createElement('script'); po.type = 'text/javascript'; po.async = true;
    po.src = 'https://apis.google.com/js/plusone.js';
    var s = document.getElementsByTagName('script')[0]; s.parentNode.insertBefore(po, s);
  })();
</script>
And this is the final code
<!DOCTYPE html>
<html lang="en">
<head>
<meta charset="utf-8">
<title>Twitter Bootstrap navbar Example</title>
<meta name="description" content="Twitter Bootstrap navbar Example">
<link href="/twitter-bootstrap/twitter-bootstrap-v2/docs/assets/css/bootstrap.css" rel="stylesheet">
<style type="text/css">
.socials {
padding: 10px;
}
</style>
</head>
<body>
<div id="fb-root"></div>
<script>(function(d, s, id) {
  var js, fjs = d.getElementsByTagName(s)[0];
  if (d.getElementById(id)) return;
  js = d.createElement(s); js.id = id;
  js.src = "//connect.facebook.net/en_GB/all.js#xfbml=1";
  fjs.parentNode.insertBefore(js, fjs);
}(document, 'script', 'facebook-jssdk'));</script>
<div class="navbar navbar-fixed-top">
  <div class="navbar-inner">
    <div class="container">
	<ul class="nav">
  <li class="active">
    <a class="brand" href="#">w3resource</a>
  </li>
  <li><a href="#">About</a></li>
  <li><a href="#">Portfolio</a></li>
  <li><a href="#">Contact</a></li>
</ul>
<ul class="nav">
  <li class="dropdown">
    <a href="#"
          class="dropdown-toggle"
          data-toggle="dropdown">
          Services
          <b class="caret"></b>
    </a>
    <ul class="dropdown-menu">
     <li><a href="#">Web Design</a></li>
  <li><a href="#">Web development</a></li>
  <li><a href="#">Wordpress Theme development</a></li>
    </ul>
  </li>
</ul>
<form class="navbar-search pull-left">
  <input type="text" class="search-query" placeholder="Search">
</form>
<ul class="nav pull-right">
  <li class="dropdown">
    <a href="#"
          class="dropdown-toggle"
          data-toggle="dropdown">
          Social
          <b class="caret"></b>
    </a>
    <ul class="dropdown-menu">
     <li class="socials"><!-- Place this tag where you want the +1 button to render -->
<g:plusone annotation="inline" width="150"></g:plusone>
</li>
  <li class="socials"><div class="fb-like" data-send="false" data-width="150" data-show-faces="true"></div></li>
  <li class="socials"><a href="https://twitter.com/share" class="twitter-share-button">Tweet</a>
<script>!function(d,s,id){var js,fjs=d.getElementsByTagName(s)[0];if(!d.getElementById(id)){js=d.createElement(s);js.id=id;js.src="//platform.twitter.com/widgets.js";fjs.parentNode.insertBefore(js,fjs);}}(document,"script","twitter-wjs");</script></li>
    </ul>
  </li>
</ul>
    </div>
  </div>
</div>
<script src="twitter-bootstrap-v2/docs/assets/js/jquery.js"></script>
<script src="twitter-bootstrap-v2/docs/assets/js/bootstrap-dropdown.js"></script>
<script type="text/javascript">
  (function() {
    var po = document.createElement('script'); po.type = 'text/javascript'; po.async = true;
    po.src = 'https://apis.google.com/js/plusone.js';
    var s = document.getElementsByTagName('script')[0]; s.parentNode.insertBefore(po, s);
  })();
</script>
</body>
</html>
You may view the example live.
Note that, you need to add a padding of 40px after opening body tag. And add that after the core Bootstrap CSS and before the optional responsive CSS.
Twitter Bootstrap also allows you to create a responsive variation of the navbar. Here is the code:
<!DOCTYPE html>
<html lang="en">
<head>
<meta charset="utf-8">
<title>Twitter Bootstrap navbar with responsive variation Example</title>
<meta name="description" content="Twitter Bootstrap navbar with responsive variation Example">
<link href="/twitter-bootstrap/twitter-bootstrap-v2/docs/assets/css/bootstrap.css" rel="stylesheet">
<link href="/twitter-bootstrap/twitter-bootstrap-v2/docs/assets/css/bootstrap-responsive.css" rel="stylesheet">
</head>
<body>
<div class="navbar">
  <div class="navbar-inner">
    <div class="container">

      <!-- .btn-navbar is used as the toggle for collapsed navbar content -->
      <a class="btn btn-navbar" data-toggle="collapse" data-target=".nav-collapse">
        <span class="icon-bar"></span>
        <span class="icon-bar"></span>
        <span class="icon-bar"></span>
      </a>

      <!-- Be sure to leave the brand out there if you want it shown -->
      <a class="brand" href="#">Project name</a>

      <!-- Everything you want hidden at 940px or less, place within here -->
      <div class="nav-collapse">
        <!-- .nav, .navbar-search, .navbar-form, etc -->
      </div>

    </div>
  </div>
</div>
</body>
</html>
You may download all the HTML, CSS, JS and image files used in our tutorials here.
Previous: Twitter Bootstrap nav, tabs and pills tutorial
Next:
Twitter Bootstrap inline labels and badges tutorial
- Weekly Trends and Language Statistics
- Weekly Trends and Language Statistics