Introduction to DOM
Objective
Document Object Model, popularly known as DOM is a W3C Specification (W3C DOM) which provides a structural/hierarchical representation of an HTML/XML document. By accessing and influencing this structural representation, programming languages (e.g. JavaScript, PHP, Python) can change the document structure, style and content. w3resource has a long series of tutorial discussing DOM. This Introduction to DOM tutorial will give you an overview of how the DOM works and what you can do with it.
A simple example
This simple example will give you some idea of what can be done with DOM. In this example, clicking on the text "Get w3resource logo" will insert the w3resource logo within the document. You can view it live here. Code used is shown below.
<html> <head> <title>A simple example of DOM manipulation</title> </head> <body><p onclick="getImage()">Get w3resource logo</p><script>function getImage(){var para = document.createElement("p");var image = document.createElement("img");image.src="https://www.w3resource.com/images/logo.png";para.appendChild(image);document.body.appendChild(para);}</script> </body></html>
If part of the JavaScript code used here is unknown to you, never mind. We will be into that later in this tutorial. In the very next part of the tutorial we will discuss some rudimentary stuff regarding DOM
Some fundamentals of DOM
Let's start with a simple HTML document. And then we will have a pictorial presenting DOM equivalent of that document.
<!doctype html><html lang="en"><head><meta charset="utf-8"><title>This is a simple HTML document</title></head><body><h1>The Bourne Ultimatum</h1><img src="http://upload.wikimedia.org/wikipedia/en/f/fe/The_Bourne_Ultimatum_(2007_film_poster).jpg" alt="The Boutne Ultimatum Poster"><p>Synopsis: The Bourne Ultimatum is a 2007 American-German action spy thriller film directed by Paul Greengrass loosely based on the Robert Ludlum novel of the same title. The screenplay was written by Tony Gilroy, Scott Z. Burns and George Nolfi.</p><ul><li>Release date: August 3, 2007 (USA)</li><li>Director: Paul Greengrass</li><li>Prequel: The Bourne Supremacy</li><li>Screenplay: Tony Gilroy, Scott Z. Burns, George Nolfi</li></ul></body></html>
Following picture shows the DOM structure of the HTML document above.

Understanding Nodes
In the context of DOM, every entity in an HTML or XML document, is referred as a Node. In JavaScript, all the Nodes are represented as Objects. They have their own properties and methods.
With respect to the above HTML document, The Document itself, is a Document Node. An XML document is also referred as a Document Node.
<Doctype html> is DocumentType Node.
<head> is an Element Node, so are meta, title, body, h1, p, ul and li.
Text contents like the title text 'This is a simple HTML document' is a text Node. So are text contents of h1, p and li elements.
Besides, you may have DocumentFragment, ProcessingInstruction and Comment as Nodes.
DocumentFragment refers to part of an HTML or XML document. An example of ProcessingInstruction may be <?xml-stylesheet type="text/xsl" href="show_movies.xsl"?> which may be part of an XML file, but they do not necessarily abide by rules of XML. Comments like <!--This is a comment.--> are also Nodes.
Some of the Nodes may have children. Like ul has li as children. body has h1, p, ul all these children. But all Nodes don't have children.
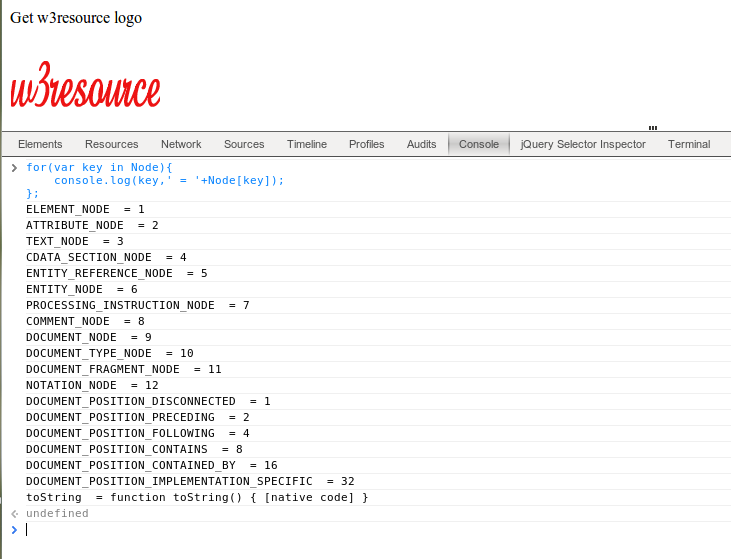
According to DOM specification, all the Node Types map to a numeric value. By that value you may understand what type of Node you are dealing with. Following JavaScript code will show all the Node types and the numeric values they map to. Open this html file in your browser, (we used chrome) and run the following code from console
for(var key in Node){ console.log(key,' = '+Node[key]); };
you will see the following output
Properties and methods for nodes
Node objects have their properties and methods. We will have an overview of most common Node properties and methods inherited by all node objects.
Node Properties: childNodes, firstChild, lastChild, nextSibling, nodeName, nodeType, nodeValue, parentNode, previousSibling
Node Methods: appendChild(), cloneNode(), compareDocumentPosition(), contains(), hasChildNodes(), insertBefore(), isEqualNode(), removeChild(), replaceChild()
HTML Element Properties: innerHTML, outerHTML, textContent, innerText, outerText, firstElementChild, lastElementChild, nextElementChild, previousElementChild, children
HTML element Methods: insertAdjacentHTML()
What can we do with DOM
We will start with a simple HTML page.
<!DOCTYPE html><html> <head> <meta charset="utf-8"/> <title>About Us</title><style>.lists { color: orange;}</style></head><body> <h1>About Us</h1> <ul> <li>Company: <span id="coname"></span> <li>Objective: <span id="objective"></span> <li>category: <span id="category"></span> </ul> </body></html>
And then will achieve the following with DOM and JavaScript
- Add a script tag just before the end of body tag.
- Set a font family "Georgia, Times, Times New Roman, serif".
- Populate each of the spans within the li with some information(Company, Objective, Category).
- Iterate through each li and add a CSS class "lists". Add a style tag that sets a rule for "lists" to make the text color orange.
- Create a new img element and set its src attribute to the logo of the company. Append that element to the page.
Now, the following javascript do the job.
document.body.style.fontFamily = 'Georgia, Times, "Times New Roman", serif;'; document.getElementById('coname').innerHTML = 'w3resource'; document.getElementById('objective').innerHTML = 'Creating quality web development tutorials'; document.getElementById('category').innerHTML = 'Internet'; var items = document.getElementsByTagName('li'); for (var i = 0; i < items.length; i++) { items[i].className = 'lists'; } var w3rlogo = document.createElement('img'); w3rlogo.src = 'https://www.w3resource.com/images/logo.png'; document.body.appendChild(w3rlogo);
You may have live demo here.
And this is what HTML document have become after running the JavaScript
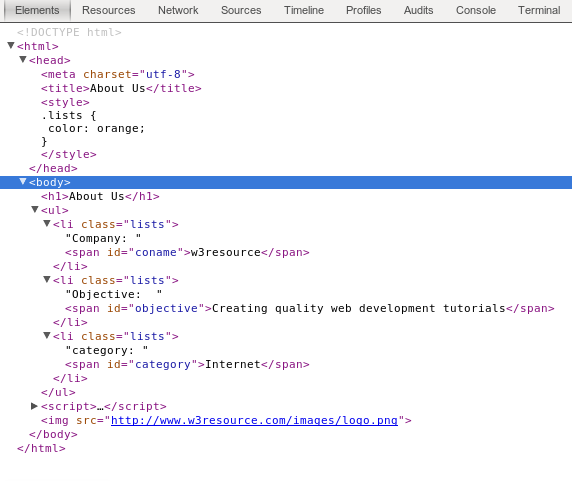
Now let us delve into some simple explanation to understand what happened.
For adding 'Georgia, Times, "Times New Roman", serif;' font-family to the body, we have used document.body.style.fontFamily = 'Georgia, Times, "Times New Roman", serif;';.
TO add text content to spans within the li, we have accessed the span by it's id using (document.getElementById('coname'),document.getElementById('objective') and document.getElementById('category')) and then using innerHTML, we have added the desired text.
Then we accessed the li using document.getElementsByTagName('li'). We stored that to a variable items. Then we executed a loop, which runs as many times as the number of li. And in each pass, we have used items[i].className = 'lists'; to add lists class to the lists.
For adding the image, we have created the image element with document.createElement('img');. Then with w3rlogo.src = 'https://www.w3resource.com/images/logo.png'; we set the src to the logo, which we want to display. Using document.body.appendChild(w3rlogo); we appended the image element of the body.
conclusion
In this tutorial we have given you a overview of what DOM is, and what can we achieve with DOM and JavaScript. If you have questions or suggestions, please use our comment section below.