HTML5 Canvas Tutorial
Introduction
Canvas is one of the most sought after feature in HTML5. Developers like to use it for creating rich web applications. Users may use those applications without using proprietary browser plug-ins like Adobe's flash player. Most of the modern browsers like Chrome, Firefox, Safari, Opera, IE9 and 10 support it. In a moment we will see what canvas is capable of and how you may use it. If you're unfamiliar with HTML5, before diving into this article, try learning more here.
What's the Canvas Element For?
Officially a canvas is "a resolution-dependent bitmap canvas which can be used for rendering graphs, game graphics, or other visual images on the fly". Simply saying, with the help of JavaScript and HTML5 canvas element you may render 2D shapes and bitmap images. The image below shows the canvas with a black border.
If you don't find this much exciting, please read on. We will see how this boring rectangle drawn with canvas may be supercharged to provide you with an awesome graphics.
A webpage may contain multiple canvas elements. Each canvas may have an id using which you may target a specific canvas through JavaScript. Each canvas element has a 2D Context. This again has objects, properties, and methods. Tinkers these, you may draw your stuff. To draw on a canvas, you need to reference the context of the canvas. The context gives you access to the 2D properties and methods that We’ll dive deeper into the context later.
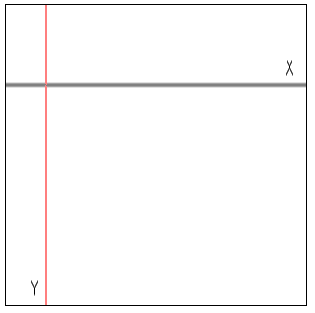
Every canvas element has x and y coordinates. X being the horizontal coordinate and y being the vertical coordinate. The following image shows these coordinates on a canvas.
Clarifying the SVG – Canvas Relationship
It’s important to understand the differences between SVG and canvas elements. SVG is an XML-based vector graphics format. You can add styles to it with CSS and add dynamic behavior to it using the SVG DOM. Canvas is bitmap based. It allows you to draw graphics and shapes through JavaScript. Like SVG, you may add style and dynamic behavior to it. Here are some reasons to use the canvas over SVG.
- When it comes to draw complex graphics, canvas is faster
- you can save images off the canvas whereas you can’t using SVG
- everything in the canvas is a pixel.
The SVG has some advantages too.
- Being resolutions independent, it can scale for different screen resolutions
- Since it is XML under the hood, targeting different elements is easier
- it’s good at complex animations
So which one to choose over another? to develop a resolution dependent, highly interactive and vector based graphics, choose SVG. If you to render graphics really fast, like in a game, or don’t want to deal with XML, choose the canvas. Actually, they complement each other while delivering real-world applications.
Canvas and Hardware Acceleration
With Hardware Acceleration enabled browsers, as a developer, you will be pleased enough. Because that renders the image/animations with the speed you desire your users should experience. Let's dive a bit deep.
Modern desktops have a GPU (Graphical Processing Unit) along with a CPU(Central Processing Unit). When it comes to delivering fast image/animation, the operation is taken care by GPU, CPU continues server for the rest of the task, resulting in accelerated graphics performance.
Chrome 27, Firefox 22, IE10, And Opera Next supports hardware acceleration and shows significant improve in rendering graphics.
Since JavaScript is the workhorse behind the Canvas, several performance tweaks can be used to the user experience by rendering image/animation faster.
Canvas 2D API
The canvas 2D API is an object that allows you to draw and manipulate images and graphics on a canvas element. To reference the context of the canvas, you call getContext, which is a method on the canvas element. It has one parameter, which currently is 2d. Here’s the snippet of code for referencing the context.
Each canvas has its own context, so if your page contains multiple canvas elements; you must have a reference to each individual context that you want to work with.
Aside from getContext, there are plenty of other functions (functions of an object are called methods in JavaScript) at your disposal in the canvas 2D API. Some of the notable ones are outlined below.
Transformation Functions :
- scale - allows you to scale the current context.
- rotate - allows you to rotate the x and y coordinates of the current context.
State Functions :
- save - allows you to save the current state of the context.
- restore - allows you to restore the state of the context from a previously saved state.
Text Functions
- font - gets or sets the font for the current context.
- fillText - renders filled text to the current canvas.
- measureText - measures the current width of the specified text.
Working with Canvas
As we become familiar with the basics of Canvas, we will bow explore some of the features Canvas we may use. In this we will focus on the basic usage of Canvas, i.e. generating fast, dynamic graphics using JavaScript. But it's worth mentioning that besides that, there lie several other aspects of using Canvas, e.g. working with Text API for Canvas, WebGL - 3D Graphics with Canvas, Full Screen API, Canvas blend modes - Method of defining the effect resulting from overlaying two layers on a Canvas element and CSS Canvas Drawings - Method of using HTML5 Canvas as a background image.
Setting Up the Canvas
To set up a canvas for drawing, your must add a <canvas> tag in HTML and assign a 2D drawing context to it. All the drawing operations are performed in the context
The <canvas> element
In your HTML, include the following codes that define the canvas element, giving it a width and height.
<canvas id="myCanvas" height="300" width="400">
</canvas>
If a width or height is not specified, the default width of 300 pixels and the default height of 150 pixels are used. The canvas is initially empty and transparent.
The rendering context
<canvas> creates a fixed-size drawing surface that exposes one or more rendering contexts, which are used to create and manipulate the content shown. We'll focus on the 2D rendering context. Other contexts may provide different types of rendering; for example, WebGL uses a 3D context ("experimental-webgl") based on OpenGL ES.
The canvas is initially blank. To display something, a script first needs to access the rendering context and draw on it. The <canvas> element has a method called getContext(), used to obtain the rendering context and its drawing functions. getContext() takes one parameter, the type of context. For 2D graphics, such as those covered by this tutorial, you specify "2d".
var canvas = document.getElementById('tutorial');
var ctx = canvas.getContext('2d');
The first line retrieves the DOM node for the <canvas> element by calling the document.getElementById() method. Once you have the element node, you can access the drawing context using its getContext() method which returns an object that provides methods and properties for drawing and manipulating images and graphics on a canvas element in a document.
Checking for support
The fallback content is displayed in browsers which do not support <canvas>. Through JavaScript you can check for support programmatically by simply testing for the presence of the getContext() method.
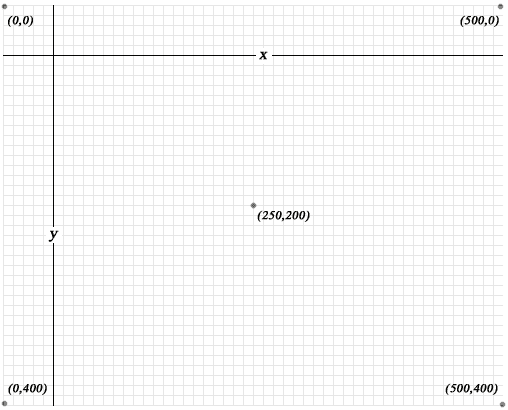
If a coordinate system lies on your browser window, then most top-left position denotes (0,0). Moving right increases the value of x and moving down increases the value of y. So if no margin is set on the body of the HTML document, browser window's (0,0) coinsides that of canvas's. See the following code :
<!DOCTYPE html>
<html>
<head>
<meta charset=utf-8 />
<title>Draw a line</title>
</head>
<body>
<canvas id="DemoCanvas" width="500" height="400"></canvas>
<script>
var canvas = document.getElementById('DemoCanvas');
//Always check for properties and methods, to make sure your code doesn't break in other browsers.
if (canvas.getContext)
{
 var ctx = canvas.getContext('2d');
// drawing code here
}
else
{
// canvas-unsupported code here
}
</script>
</body>
</html>
Pictorial Presentation of the above Canvas :
Browser support and polyfills
Like so many other features of HTML5, you need to test whether Canvas is supported in the rendering browser. As of this writing, IE 9.0, 10.0 and 11.0, Firefox 2.0 to 26.0, Chrome 4.0 to 31.0, Safari 3.1 to 7.0, Opera 9.0 to 17.0, iOS Safari 3.2 to 7.0, Opera mini 5.0-7.0, Android Browser 2.1-4.3, Blackberry 7.0 and 10.0 and IE Mobile 10.0 supports Canvas basic. That covers most of the modern browsers you may understand well. If you think that you may have visitors from browsers not supporting Canvas, you may use any of the several polyfills available. Following is a list of name usage (typically you add those codes within head section of your HTML page) of some of the most used of those
flashcanvas
<!--[if lt IE 9]>
<script type="text/javascript" src="path/to/flashcanvas.js"></script>
<![endif]-->
You may download flashcanvas from http://flashcanvas.net/download
explorercanvas
<!--[if IE]><script src="excanvas.js"></script><![endif]-->
You may download explorercanvas from http://code.google.com/p/explorercanvas/downloads/list
slcanvas
<script src="http://silverlightcanvas.appspot.com/static/slcanvas.js" ></script>
You may add this to the bottom of your HTML document.
You may download slcanvas from http://slcanvas.codeplex.com/releases/view/41025
fxcanvas
<script type="text/javascript" src="/public/path/jooscript.js"></script>
  <script type="text/javascript" src="/public/path/fxcanvas.js"></script>
  <!--[if IE]><script type="text/javascript" src="/public/path/flash_backend.js"></script><![endif]-->
  <comment><script type="text/javascript" src="/public/path/canvas_backend.js"></script></comment>
You may download fxcanvas from http://code.google.com/p/fxcanvas/downloads/detail?name=fxcanvas-0.2(beta4)-supersonic.zip
kineticjs
You may explore how to use kineticjs from http://kineticjs.com/docs/
You may download kineticjs from
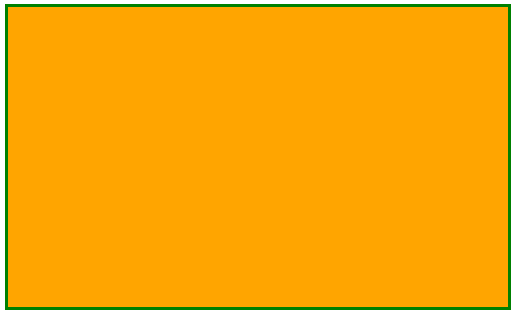
<!DOCTYPE html>
<html>
<head>
<title>HTML5 Canvas Demo</title>
<style>
#FirstCanvas{
width: 500px;
height: 300px;
border: 3px solid green;
background-color: orange;
}
</style>
</head>
<body>
<canvas id="FirstCanvas"></canvas>
</body>
</html>
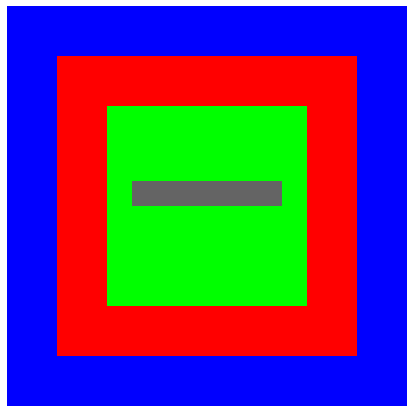
Creating a canvas with various methods
<!DOCTYPE html>
<html>
<head>
<title>HTML5 Canvas example with various methods </title>
<script>
 window.onload=function() {
   var w3rcanvas=document.getElementById("w3rCanvasTag");
   var w3rcontext=w3rcanvas.getContext('2d');
   w3rcontext.fillStyle='rgb(0,0,255)'; //Sets the color used for filling an area
   w3rcontext.fillRect(0,0,400,400);   //Fills a rectangle positioned at x and y, with a width and height of w and h.
   w3rcontext.fillStyle='rgb(255,0,0)';
   w3rcontext.fillRect(50,50,300,300);
   w3rcontext.fillStyle='rgb(0,255,0)';
   w3rcontext.fillRect(100,100,200,200);
   w3rcontext.fillStyle='rgb(100,100,100)';
   w3rcontext.fillRect(125,175,150,25);
 }
</script>
</head>
<body>
<div>
<canvas id="w3rCanvasTag" width="400" height="400"></canvas>
</div>
</body>
</html>
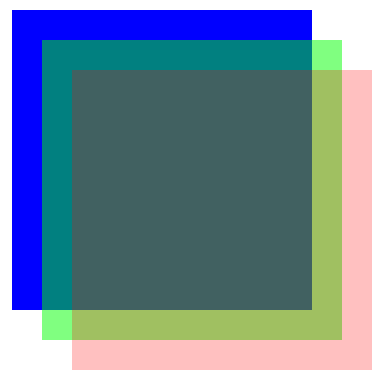
Creating a canvas with transparency
<!DOCTYPE html>
<html>
<head>
<title>HTML5 Canvas with transparency example</title>
<script>
  window.onload=function() {
    var w3rcanvas=document.getElementById("w3rCanvasTag");
    var w3rcontext=w3rcanvas.getContext('2d');
    w3rcontext.fillStyle='rgb(0,0,255)';
    w3rcontext.fillRect(30,30,300,300);
    w3rcontext.fillStyle='rgba(0,255,0,0.5)';
    w3rcontext.fillRect(60,60,300,300);
    w3rcontext.fillStyle='rgba(255,0,0,0.25)';
    w3rcontext.fillRect(90,90,300,300);
  }
</script>
</head>
<body>
<canvas id="w3rCanvasTag" width="400" height="400"></canvas>
</body>
</html>
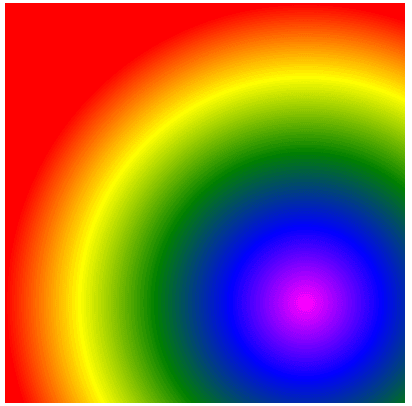
Creating a canvas with gradient
<!DOCTYPE html>
<html>
<head>
<title>HTML5 Canvas gradient example</title>
<script>
  window.onload=function() {
    var w3rcanvas=document.getElementById("w3rCanvasTag");
    var w3rcontext=w3rcanvas.getContext('2d');
    var w3rgradient=w3rcontext.createRadialGradient(300,300,0,300,300,300);
    w3rgradient.addColorStop("0","magenta");// Adds a color stop to a gradient. A color stop is a position in the gradient where a color 							change occurs. The offset must be between 0 and 1.
    w3rgradient.addColorStop(".25","blue");
    w3rgradient.addColorStop(".50","green");
    w3rgradient.addColorStop(".75","yellow");
    w3rgradient.addColorStop("1.0","red");
    w3rcontext.fillStyle=w3rgradient;
    w3rcontext.fillRect(0,0,400,400);
  }
</script>
</head>
<body>
<canvas id="w3rCanvasTag" width="400" height="400"></canvas>
</body>
</html>
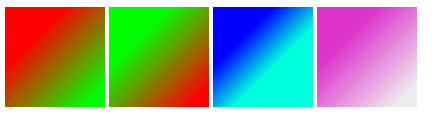
Using multiple canvas elements
<!DOCTYPE html>
<html>
<head>
<title>HTML5 Canvas Demo</title>
<!--[if IE]>
  <script type="text/javascript" src="excanvas.js"></script>
<![endif]-->
<script>
  window.onload=function() {
    var mycontext1=document.getElementById("myCanvasTag1").getContext('2d');
    var mycontext2=document.getElementById("myCanvasTag2").getContext('2d');
    var mycontext3=document.getElementById("myCanvasTag3").getContext('2d');
    var mycontext4=document.getElementById("myCanvasTag4").getContext('2d');
    // gradient 1
    var mygradient1=mycontext1.createLinearGradient(30,30,90,90);
    mygradient1.addColorStop(0,"#FF0000");
    mygradient1.addColorStop(1,"#00FF00");
    mycontext1.fillStyle=mygradient1;
    mycontext1.fillRect(0,0,100,100);
    // gradient 2
    var mygradient2=mycontext2.createLinearGradient(30,30,90,90);
    mygradient2.addColorStop(1,"#FF0000");
    mygradient2.addColorStop(0,"#00FF00");
    mycontext2.fillStyle=mygradient2;
    mycontext2.fillRect(0,0,100,100);

    var mygradient3=mycontext3.createLinearGradient(30,30,90,90);
    mygradient3.addColorStop(0,"#0000FF");
    mygradient3.addColorStop(.5,"#00FFDD");
    mycontext3.fillStyle=mygradient3;
    mycontext3.fillRect(0,0,100,100);

    var mygradient4=mycontext1.createLinearGradient(30,30,90,90);
    mygradient4.addColorStop(0,"#DD33CC");
    mygradient4.addColorStop(1,"#EEEEEE");
    mycontext4.fillStyle=mygradient4;
    mycontext4.fillRect(0,0,100,100);
  }
</script>
</head>
<body>
<div style="margin-left:30px;">
<canvas id="myCanvasTag1" width="100" height="100" style="border: 10px blue solid">
</canvas>
<canvas id="myCanvasTag2" width="100" height="100" style="border: 10px green solid">
</canvas>
<br />
<canvas id="myCanvasTag3" width="100" height="100" style="border: 10px red solid">
</canvas>
<canvas id="myCanvasTag4" width="100" height="100" style="border: 10px black solid">
</canvas>
<br /><br />
<a href="index.html">back</a>
</div>
</body>
</html>
Text with Canvas
<!DOCTYPE HTML>
<html>
<head>
<title>HTML5 Canvas Text example</title>
<script>
function CreateText() {
	var canvas=document.getElementById("w3rCanvas");
	var context=canvas.getContext("2d");

	var x = 100;
	var y = 100;
        context.font = 'bold 32pt Arial';//sets font style, size and type
        context.fillStyle = 'orange';//sets font color
	context.fillText("Welcome to w3resource!", x, y);//sets text to be rendered
}

</script>
</head>
<body onload="CreateText()">
	<canvas id="w3rCanvas" width="700" height="150"></canvas>
</body>
</html>

Drawing image with Canvas
<!DOCTYPE HTML>
<html>
  <head>
<title>Drawing image with Canvas</title>
    <style>
      body {
        margin: 0px;
        padding: 0px;
      }
    </style>
  </head>
  <body>
    <canvas id="w3rCanvas" width="500" height="400"></canvas>
    <script>
      var canvas = document.getElementById('w3rCanvas');
      var context = canvas.getContext('2d');
      var imgObj = new Image();

      imgObj.onload = function() {
        context.drawImage(imgObj, 150, 78);
      };
      imgObj.src = '//www.w3resource.com/images/logo.png';
    </script>
  </body>
</html>

Basic animation with with Canvas
<!doctype html>
<html>
  <head>
    <meta charset="UTF-8" />
    <title>Basic Animation with Canvas example</title>
  </head>
<body>
        <canvas id="canvas" width="400" height="300">
         If you can see this, your browser does not support Canvas
        </canvas>
<script>
var canvas;
var ctx;
var x = 400;
var y = 300;
var dx = 2;
var dy = 4;
var width = 400;
var height = 300;

function circle(x,y,r) {
  ctx.beginPath();
  ctx.arc(x, y, r, 0, Math.PI*2, true);
  ctx.fill();
}

function rect(x,y,w,h) {
  ctx.beginPath();
  ctx.rect(x,y,w,h);
  ctx.closePath();
  ctx.fill();
}


function reset() {
  ctx.clearRect(0, 0, width, height);
}

function init() {
  canvas = document.getElementById("canvas");
  ctx = canvas.getContext("2d");
  return setInterval(animate, 10);
}


function animate() {
  reset();
  ctx.fillStyle = "#FAF7F8";
  rect(0,0,width,height);
  ctx.fillStyle = "#444444";
  circle(x, y, 10);

  if (x + dx > width || x + dx < 0)
    dx = -dx;
  if (y + dy > height || y + dy < 0)
    dy = -dy;

  x += dx;
  y += dy;
}

init();
</script>
</body>
</html>
A bit of explanation of what is needed to be done to create a simple animation with Canvas is as follows.
function circle, function rect is used to create the circle which is moving and rectangle within which the circle is animating. function reset clears the canvas. function init creates the canvas and returns function animate. setInterval is set to 10 milliseconds, so every after every 10 milliseconds the circle is touching any of the surfaces.
Radius of the circle is 10 and its origin is at (x,y). If we change change x and y, the circle moves. dx and dy are two variables to determine the amount of changes to be made after every 10 milliseconds. x is changed by dx as far as the value of x+dx is not greater than the width of the canvas or less than 0. When it is so, we reverse it by making dx = -dx. Similar concept is applied for y and dy.
Canvas on mobile
We have already seen the list Mobile Browsers support Canvas. But there are certain issues which you need to keep in mind.
HTML5 Canvas is all bitmap, that means it is all pixels. Which makes the rendered graphics resolution dependant. Further, you do not have DOM nodes to be manipulated here. It is not suited for application user interfaces also. Whenever you want to draw something, you need to draw that manually(through JavaScript).
You can though bring responsiveness to Canvas Based graphics using some tweaks in JavaScript.
Canvas can be made to work with Web worker API through a canvas proxy other wise Web Workers would not reach DOM nodes.
Libraries
There are several JavaScript libraries available to ease the process of working with Canvas. Here is a short list
- kinetic.js
- Easel.js
- Fabric.js
- Zebra
Next: HTML5 Canvas Line