Building a basic calculator with Python and PyQt
Write a Python program that builds a basic calculator application with buttons for numbers and operators using PyQt. When buttons are clicked, they display the input and perform calculations.
From doc.qt.io:
QApplication Class: The QApplication class manages the GUI application's control flow and main settings.
QMainWindow Class: The QMainWindow class provides a main application window.
QPushButton: The push button, or command button, is perhaps the most commonly used widget in any graphical user interface. Push (click) a button to command the computer to perform some action, or to answer a question. Typical buttons are OK, Apply, Cancel, Close, Yes, No and Help.
QVBoxLayout Class: The QVBoxLayout class lines up widgets vertically.
QHBoxLayout Class: The QHBoxLayout class lines up widgets horizontally.
QWidget: The QWidget class is the base class of all user interface objects.
QLineEdit Class: The QLineEdit widget is a one-line text editor.
Qt module: PyQt5 is a set of Python bindings for the Qt application framework. It allows us to use Qt, a popular C++ framework, to create graphical user interfaces (GUIs) in Python.
Sample Solution:
Python Code:
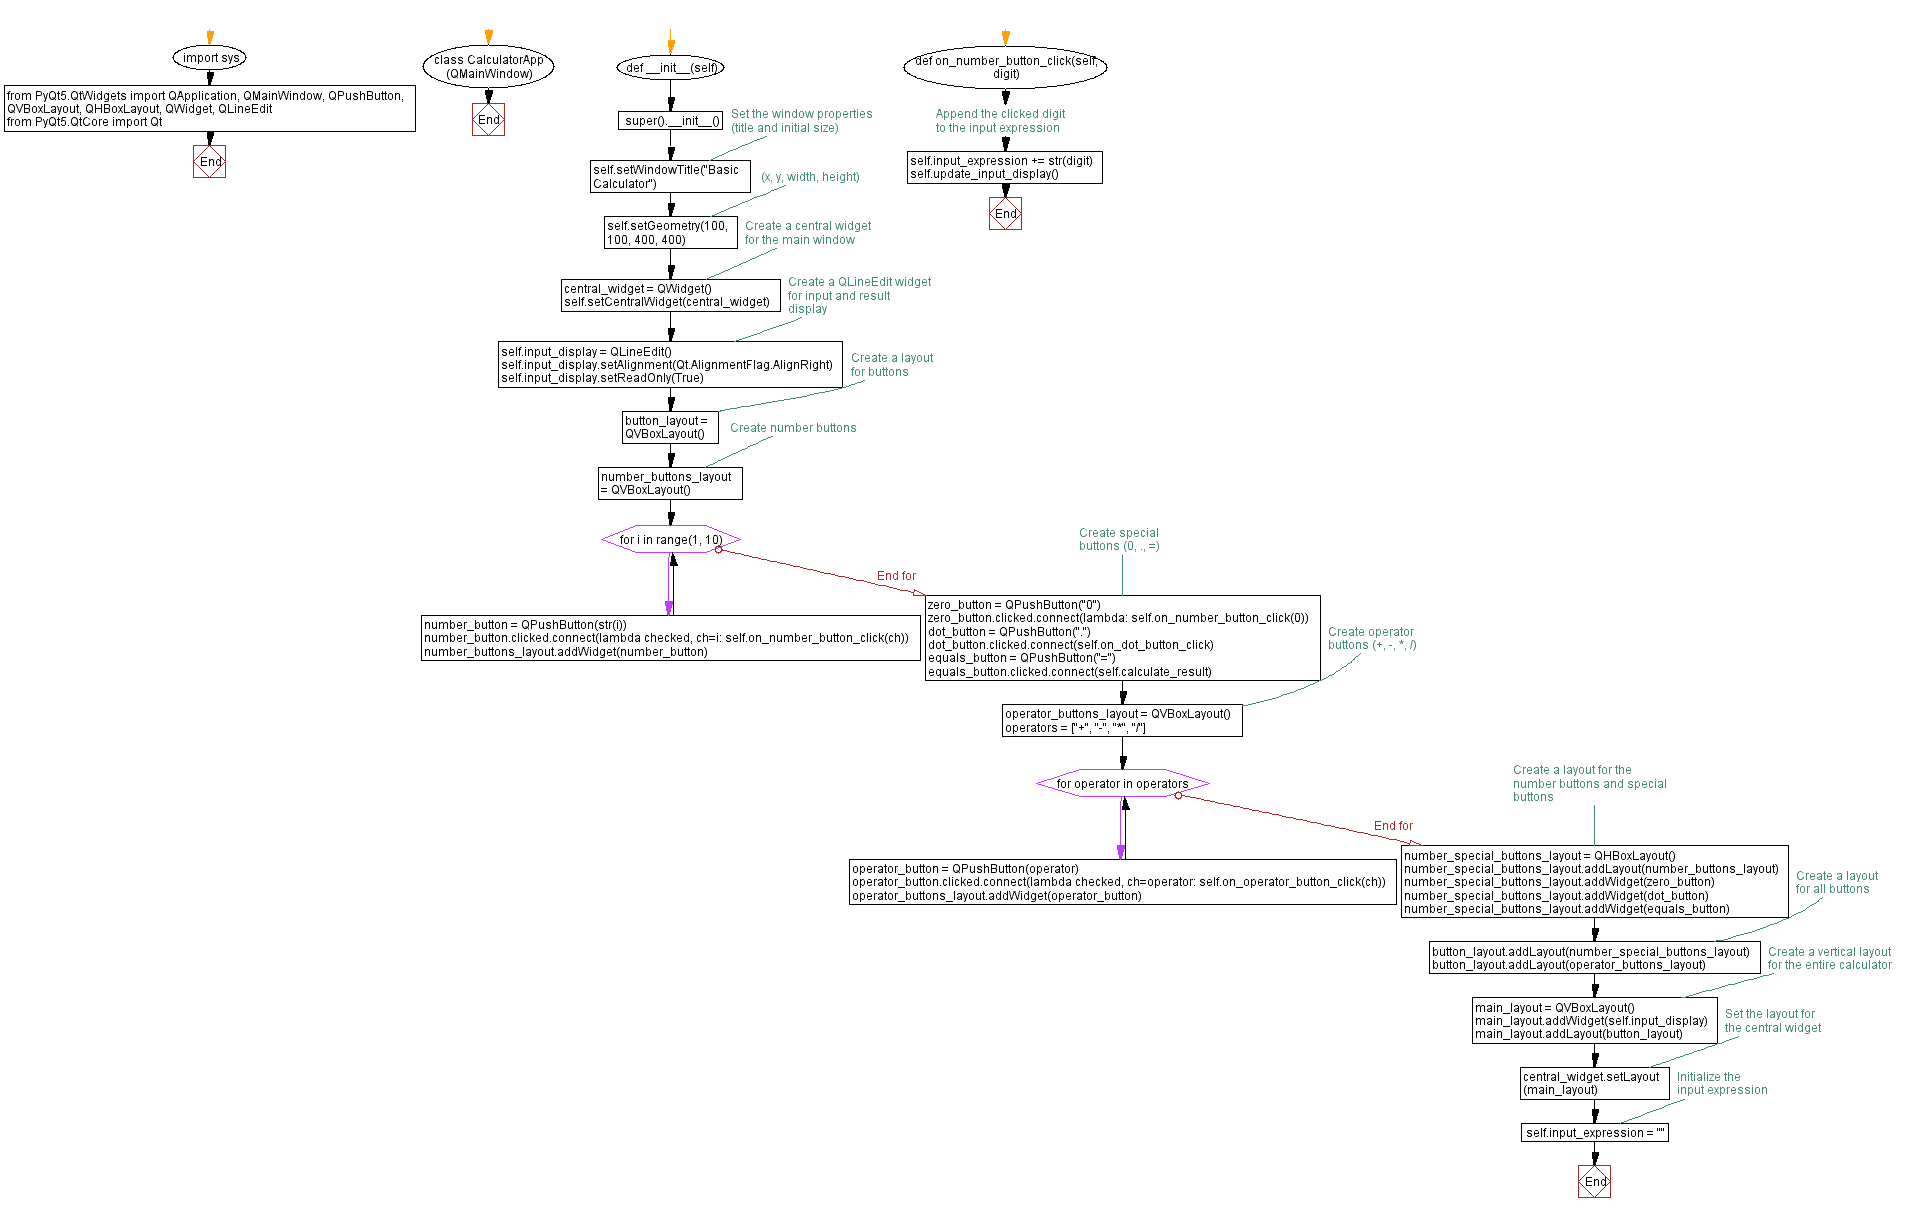
import sys
from PyQt5.QtWidgets import QApplication, QMainWindow, QPushButton, QVBoxLayout, QHBoxLayout, QWidget, QLineEdit
from PyQt5.QtCore import Qt
class CalculatorApp(QMainWindow):
def __init__(self):
super().__init__()
# Set the window properties (title and initial size)
self.setWindowTitle("Basic Calculator")
self.setGeometry(100, 100, 400, 400) # (x, y, width, height)
# Create a central widget for the main window
central_widget = QWidget()
self.setCentralWidget(central_widget)
# Create a QLineEdit widget for input and result display
self.input_display = QLineEdit()
self.input_display.setAlignment(Qt.AlignmentFlag.AlignRight)
self.input_display.setReadOnly(True)
# Create a layout for buttons
button_layout = QVBoxLayout()
# Create number buttons
number_buttons_layout = QVBoxLayout()
for i in range(1, 10):
number_button = QPushButton(str(i))
number_button.clicked.connect(lambda checked, ch=i: self.on_number_button_click(ch))
number_buttons_layout.addWidget(number_button)
# Create special buttons (0, ., =)
zero_button = QPushButton("0")
zero_button.clicked.connect(lambda: self.on_number_button_click(0))
dot_button = QPushButton(".")
dot_button.clicked.connect(self.on_dot_button_click)
equals_button = QPushButton("=")
equals_button.clicked.connect(self.calculate_result)
# Create operator buttons (+, -, *, /)
operator_buttons_layout = QVBoxLayout()
operators = ["+", "-", "*", "/"]
for operator in operators:
operator_button = QPushButton(operator)
operator_button.clicked.connect(lambda checked, ch=operator: self.on_operator_button_click(ch))
operator_buttons_layout.addWidget(operator_button)
# Create a layout for the number buttons and special buttons
number_special_buttons_layout = QHBoxLayout()
number_special_buttons_layout.addLayout(number_buttons_layout)
number_special_buttons_layout.addWidget(zero_button)
number_special_buttons_layout.addWidget(dot_button)
number_special_buttons_layout.addWidget(equals_button)
# Create a layout for all buttons
button_layout.addLayout(number_special_buttons_layout)
button_layout.addLayout(operator_buttons_layout)
# Create a vertical layout for the entire calculator
main_layout = QVBoxLayout()
main_layout.addWidget(self.input_display)
main_layout.addLayout(button_layout)
# Set the layout for the central widget
central_widget.setLayout(main_layout)
# Initialize the input expression
self.input_expression = ""
def on_number_button_click(self, digit):
# Append the clicked digit to the input expression
self.input_expression += str(digit)
self.update_input_display()
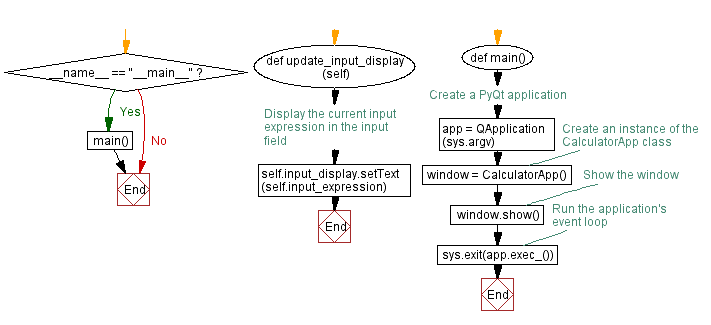
def on_dot_button_click(self):
# Append a decimal point to the input expression
if "." not in self.input_expression:
self.input_expression += "."
self.update_input_display()
def on_operator_button_click(self, operator):
# Append the clicked operator to the input expression
if self.input_expression and self.input_expression[-1] != operator:
self.input_expression += operator
self.update_input_display()
def calculate_result(self):
try:
# Calculate the result of the input expression
result = eval(self.input_expression)
self.input_expression = str(result)
self.update_input_display()
except Exception as e:
# Handle calculation errors (e.g., division by zero)
self.input_expression = "Error"
self.update_input_display()
def update_input_display(self):
# Display the current input expression in the input field
self.input_display.setText(self.input_expression)
def main():
# Create a PyQt application
app = QApplication(sys.argv)
# Create an instance of the CalculatorApp class
window = CalculatorApp()
# Show the window
window.show()
# Run the application's event loop
sys.exit(app.exec_())
if __name__ == "__main__":
main()
Explanation:
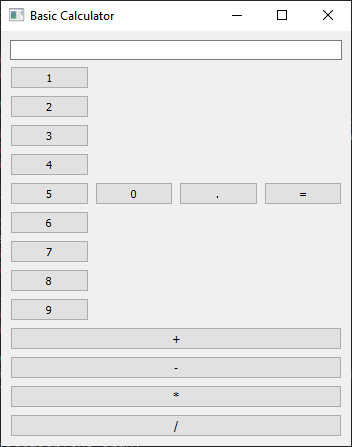
The above code creates a basic calculator with buttons for numbers (0-9) and operators (+, -, *, /). Users can input an expression by clicking on the buttons. Clicking the "=" button will calculate the result, which will be displayed in the input field.
Output:
Flowchart:

Go to:
Previous: Creating a custom widget in PyQt.
Next: Customizing widget behavior with PyQt event handling.
Python Code Editor:
What is the difficulty level of this exercise?
Test your Programming skills with w3resource's quiz.