Creating custom buttons with Python Tkinter
Write a Python program that creates a custom button widget with a distinct color and shape using Tkinter.
Sample Solution:
Python Code:
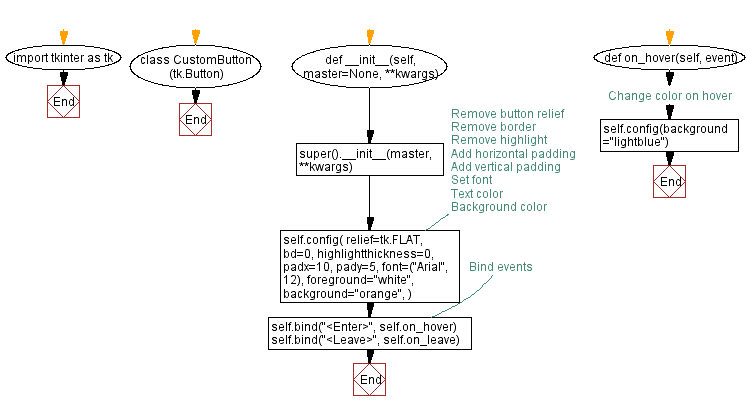
import tkinter as tk
class CustomButton(tk.Button):
def __init__(self, master=None, **kwargs):
super().__init__(master, **kwargs)
self.config(
relief=tk.FLAT, # Remove button relief
bd=0, # Remove border
highlightthickness=0, # Remove highlight
padx=10, # Add horizontal padding
pady=5, # Add vertical padding
font=("Arial", 12), # Set font
foreground="white", # Text color
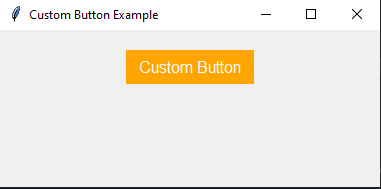
background="orange", # Background color
)
# Bind events
self.bind("<Enter>", self.on_hover)
self.bind("<Leave>", self.on_leave)
def on_hover(self, event):
self.config(background="lightblue") # Change color on hover
def on_leave(self, event):
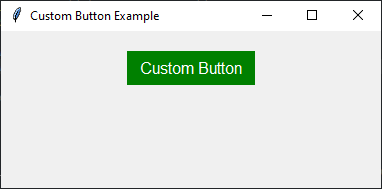
self.config(background="green") # Restore original color
# Create the main window
root = tk.Tk()
root.title("Custom Button Example")
# Create a custom button
custom_button = CustomButton(root, text="Custom Button")
custom_button.pack(pady=20)
# Start the Tkinter main loop
root.mainloop()
Explanation:
In the exercise above -
- Import the "tkinter" library.
- Create a custom button class, "CustomButton", which subclasses "tk.Button".
- Inside the "CustomButton" class's constructor (__init__ method):
- Call the superclass's constructor using super().__init__(master, **kwargs) to initialize the button.
- Use the self.config() method to customize the appearance of the button:
- relief=tk.FLAT: Removes the button's relief (border).
- bd=0: Sets the border width to 0, effectively removing the border.
- highlightthickness=0: Removes the highlight when the button is clicked.
- padx=10 and pady=5: Adds horizontal and vertical padding to the button.
- font=("Arial", 12): Sets the font for the button text.
- foreground="white": Sets the text color to white.
- background="orange": Sets the background color to orange.
- We bind two events to the button:
- <Enter>: When the mouse enters the button, it calls the on_hover method.
- <Leave>: When the mouse leaves the button, it calls the on_leave method.
- The "on_hover()" method changes the button's background color to "lightblue" when the mouse hovers over it.
- The "on_leave()" method restores the button's background color to "green" when the mouse leaves it.
- Create the main application window using 'tk.Tk()' and set its title to "Custom Button Example."
- Create an instance of the "CustomButton" class named "custom_button" and place it in the window using "custom_button.pack(pady=20)".
- Finally, start the Tkinter main loop with "root.mainloop()".
Output:
Flowchart:

Go to:
Previous: Python Tkinter Custom Widgets and Themes Home.
Next: Designing custom checkboxes in Python Tkinter.
Python Code Editor:
What is the difficulty level of this exercise?
Test your Programming skills with w3resource's quiz.