MongoDB Backup and Restore
Introduction
The Backup and Restore in MongoDB is an important part to handle a database. This utility is important because your valuable data can be removed or crashed or corrupted from your server, your local machine by accidentally or by any mistake, whatever it may be. On that vital moment, you can keep safe by restoring your data if you have a backup of your valuable data. Backup can be done in various format. Here, in this article, we will describe the process for creating backups and restoring data using the utilities provided with MongoDB
MongoDB Backup
Backup a Database with mongodump
The backup utility of MongoDB can create a backup for an entire server, database or collection, or you can use a query to backup for a part of a collection.
When mongodump only runs without any arguments, the command connects to the MongoDB instance on the local system (e.g. localhost) on port 27017 and creates a database backup named dump/ in the current directory.
Here is the command to backup data from a mongod or mongos instance running on the same machine and on the default port of 27017.
To take the backup you have to enter the bin directory into the mongodb folder on your machine. Here our path is D:\mongodb\bin and you have to execute the command from here.
D:\mongodb\bin>mongodump
Here is the output
D:\mongodb\bin>mongodump
connected to: 127.0.0.1
2015-04-24T16:12:38.401+0530 all dbs
2015-04-24T16:12:38.402+0530 DATABASE: myinfo    to     dump\myinfo
2015-04-24T16:12:38.403+0530    myinfo.system.indexes to dump\myinfo\system.indexes.bson
2015-04-24T16:12:38.404+0530             1 documents
2015-04-24T16:12:38.404+0530    myinfo.userdetails to dump\myinfo\userdetails.bson
2015-04-24T16:12:38.406+0530             1 documents
2015-04-24T16:12:38.406+0530    Metadata for myinfo.userdetails to dump\myinfo\userdetails.metadata.json
2015-04-24T16:12:38.408+0530 DATABASE: test      to     dump\test
2015-04-24T16:12:38.409+0530    test.system.indexes to dump\test\system.indexes.bson
2015-04-24T16:12:38.410+0530             1 documents
2015-04-24T16:12:38.410+0530    test.userdetails to dump\test\userdetails.bson
2015-04-24T16:12:38.411+0530             1 documents
2015-04-24T16:12:38.412+0530    Metadata for test.userdetails to dump\test\userdetails.metadata.json
2015-04-24T16:12:38.413+0530 DATABASE: admin     to     dump\admin
Backup a Database with mongodump specify the --host and --port
Here in the example below the host is mypc-PC and port is the default port 27017.
D:\mongodb\bin>mongodump --host mypc-PC --port 27017
Here is the output
D:\mongodb\bin>mongodump --host mypc-PC  --port 27017
connected to: bidhan-PC:27017
2015-04-25T10:49:53.994+0530 all dbs
2015-04-25T10:49:53.997+0530 DATABASE: myinfo    to     dump\myinfo
2015-04-25T10:49:53.998+0530    myinfo.system.indexes to dump\myinfo\system.indexes.bson
2015-04-25T10:49:53.999+0530             1 documents
2015-04-25T10:49:54.000+0530    myinfo.userdetails to dump\myinfo\userdetails.bson
2015-04-25T10:49:54.000+0530             1 documents
2015-04-25T10:49:54.001+0530    Metadata for myinfo.userdetails to dump\myinfo\userdetails.metadata.json
2015-04-25T10:49:54.002+0530 DATABASE: test      to     dump\test
2015-04-25T10:49:54.005+0530    test.system.indexes to dump\test\system.indexes.bson
2015-04-25T10:49:54.006+0530             1 documents
2015-04-25T10:49:54.007+0530    test.userdetails to dump\test\userdetails.bson
2015-04-25T10:49:54.009+0530             1 documents
2015-04-25T10:49:54.009+0530    Metadata for test.userdetails to dump\test\userdetails.metadata.json
2015-04-25T10:49:54.011+0530 DATABASE: admin     to     dump\admin
N.B. : The mongodump command overwrites output files if they already exist in the backup data folder. So, it is better to ensure that, you no longer need the files in the output folder or you have taken a copy of the previous backup folder, before to run the mongodump command multiple times.
Backup a Database with mongodump specify different output directory
You can take the backup in specific directory by using the --out or -o option. Here in the example below we mention the directory under D: is backup_data/backup/ folder.
D:\mongodb\bin>mongodump --out /backup_data/backup/
Here is the output
D:\mongodb\bin>mongodump --out /backup_data/backup/
connected to: 127.0.0.1
2015-04-25T11:01:51.677+0530 all dbs
2015-04-25T11:01:51.679+0530 DATABASE: myinfo    to     /backup_data/backup/myinfo
2015-04-25T11:01:51.694+0530    myinfo.system.indexes to /backup_data/backup/myinfo\system.indexes.bson
2015-04-25T11:01:51.695+0530             1 documents
2015-04-25T11:01:51.696+0530    myinfo.userdetails to /backup_data/backup/myinfo\userdetails.bson
2015-04-25T11:01:51.696+0530             1 documents
2015-04-25T11:01:51.696+0530    Metadata for myinfo.userdetails to /backup_data/backup/myinfo\userdetails.metadata.json
2015-04-25T11:01:51.853+0530 DATABASE: test      to     /backup_data/backup/test
2015-04-25T11:01:51.854+0530    test.system.indexes to /backup_data/backup/test\system.indexes.bson
2015-04-25T11:01:51.855+0530             1 documents
2015-04-25T11:01:51.856+0530    test.userdetails to /backup_data/backup/test\userdetails.bson
2015-04-25T11:01:51.857+0530             1 documents
2015-04-25T11:01:51.858+0530    Metadata for test.userdetails to /backup_data/backup/test\userdetails.metadata.json
2015-04-25T11:01:51.860+0530 DATABASE: admin     to     /backup_data/backup/admin
N.B. : The mongodump command overwrites output files if they already exist in the backup data folder. So, it is better to ensure that, you no longer need the files in the output folder or you have taken a copy of the previous backup folder, before to run the mongodump command multiple times.
Backup of a specific collection and a specific database using mongodump
If you want to take the backup of a specific database and a specific collection using mongodump command you can specify --db and --collection as options to mongodump.
Here in the example below our database is myinfo and collection is userdetails .
D:\mongodb\bin>mongodump --collection userdetails --db myinfo
The operation above will create a dump of the collection named userdetails from the database myinfo in a dump/ subdirectory of the current working directory. Here is the output
D:\mongodb\bin>mongodump --collection userdetails --db myinfo
connected to: 127.0.0.1
2015-04-25T11:17:46.770+0530 DATABASE: myinfo    to     dump\myinfo
2015-04-25T11:17:46.771+0530    myinfo.userdetails to dump\myinfo\userdetails.bson
2015-04-25T11:17:46.772+0530             1 documents
2015-04-25T11:17:46.772+0530    Metadata for myinfo.userdetails to dump\myinfo\userdetails.metadata.json
N.B. : The mongodump command overwrites output files if they already exist in the backup data folder. So, it is better to ensure that, you no longer need the files in the output folder or you have taken a copy of the previous backup folder, before to run the mongodump command multiple times.
Create Backups from Non-Local mongod Instances
In this type of backup the --host and --port options for mongodump allow the user to connect to and backup from a remote host. Here is the command like:
mongodump --host [host name] --port 3017 --username [user] --password [pass] --out [backup folder path of local machine]
for example, the path of the folder  like :   /backup_data/backup/
MongoDB Database and Collection Backup using Export in CSV Format
MongoDB data can be exported using mongoexport command. The mongoexport command connects to mongod instance that is running on the localhost port number 27017.
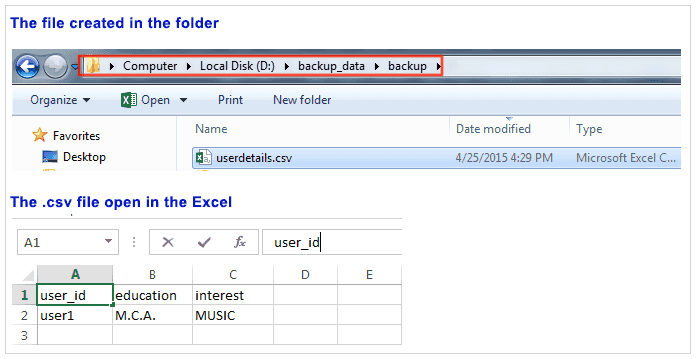
Here in the example below exports data from the collection userdetails which is in the myinfo database in CSV format to the file D:\backup_data\backup\userdetails.csv.
When you export in CSV format, you must specify the fields in the documents to export and in the example below the specific fields are user_id, education, and interest.
D:\mongodb\bin>mongoexport --db myinfo --collection userdetails --csv --fields user_id,education,interest --out /opt/backups/userdetails.csv
Here is the output
D:\mongodb\bin>mongoexport --db myinfo --collection userdetails --csv --fields user_id,education,interest --out /opt/backups/userdetails.csv
connected to: 127.0.0.1
exported 1 records
You can open this file in Excel. Here is the file showing in the mention directory and the data exported in .csv format.
Export in CSV Format using file containing field list
You can also specify the fields in a file containing the line-separated list of fields to export and use this .txt file along with --fieldFile option in the mongoexport command.
Here is the myfields.txt file like below. Open a Notepad editor and write the following text, only one field in one line, then save the file in a name as you like in the \mondodb\bin\ folder and use this name in the command. Here our file name is myfields.txt and we have used this name.
user_id
education
interest
Here is the command
D:\mongodb\bin>mongoexport --db myinfo --collection userdetails --csv --fieldFile myfields.txt --out /backup_data/backup/userdetails.csv
Here is the output
D:\mongodb\bin>mongoexport --db myinfo --collection userdetails --csv --fieldFile  myfields.txt --out /backup_data/backup/userdetails.csv
connected to: 127.0.0.1
exported 1 records
Export in JSON Format
The example below exports the collection userdetails from the MongoDB instance running on the localhost port number 27017, with journaling explicitly enabled. This command writes the exported data to the file newuserdetails.json in JSON format.
Here is the command
D:\mongodb\bin>mongoexport --db myinfo --collection userdetails --out /backup_data/backup/newuserdetails.json --journal
Here is the output
D:\mongodb\bin>mongoexport --db myinfo --collection userdetails --out /backup_data/backup/newuserdetails.json --journal
connected to: 127.0.0.1
exported 1 records
Export from Remote Host Running with Authentication
The example below exports the collection userdetails from the database myinfo, which requires authentication. Assume that this data resides on the MongoDB instance located on the host [your_domain.example.com] running on port 37017, which requires the username [name of the user] and the password [your password].
Our collection name is userdetails and db is myinfo and the location and the backup file name is D:\backup_data\backup\newuserdetails.json
mongoexport --host [your_domain.example.com] --port 37017 --username [name of the user] --password [your password] --collection userdetails --db myinfo --out /backup_data/backup/newuserdetails.json
Export Query Results
Only the results of a query can also be exported with the --query option, and limit the results to a single database using the "--db" option.
Here in the example below, this command returns all documents from the collection userdetails in the database myinfo that contain a field named interest and which value is MUSIC.
Here is the command
D:\mongodb\bin>mongoexport --db myinfo --collection userdetails --query "{'interest' : 'MUSIC'}";
Here is the output
D:\mongodb\bin>mongoexport --db myinfo --collection userdetails --query "{'interest' : 'MUSIC'}";
connected to: 127.0.0.1
{ "_id" : { "$oid" : "553a1e0f195e5fc01733c693" }, "user_id" : "user1", "password" : "1a2b3c", "date_of_join" : "16/10/2010", "education" : "M.C.A.", "profession" : "CONSULTANT", "interest" : "MUSIC", "community_name" : [ "MODERN MUSIC", "CLASSICAL MUSIC", "WESTERN MUSIC" ], "community_moder_id" : [
 "MR. Alex", "MR. Dang", "MR Haris" ], "community_members" : [ 700, 200, 1500 ], "friends_id" : [ "kumar", "harry", "anand" ], "ban_friends_id" : [ "Amir", "Raja", "mont" ] }
exported 1 records
MongoDB Restore
Restore from dump using mongorestore
The restore utility using mongorestore command restores a binary backup created by mongodump. The mongorestore can restore either an entire database backup or a subset of the backup.
The following command will import the database backup in the dump folder to the mongod instance running on the localhost interface. Here is the command. Here we did not mention the folder name, so by default, the database backup in the dump folder will be imported.
D:\mongodb\bin>mongorestore
Here is the output
D:\mongodb\bin>mongorestore
connected to: 127.0.0.1
2015-04-27T11:00:02.302+0530 dump\myinfo\userdetails.bson
2015-04-27T11:00:02.302+0530    going into namespace [myinfo.userdetails]
Restoring to myinfo.userdetails without dropping. Restored data will be inserted without raising errors; check your server log
1 objects found
2015-04-27T11:00:02.314+0530    Creating index: { key: { _id: 1 }, name: "_id_", ns: "myinfo.userdetails" }
2015-04-27T11:00:02.366+0530 dump\test\userdetails.bson
2015-04-27T11:00:02.366+0530    going into namespace [test.userdetails]
Restoring to test.userdetails without dropping. Restored data will be inserted without raising errors; check your server log
1 objects found
2015-04-27T11:00:02.381+0530    Creating index: { key: { _id: 1 }, name: "_id_", ns: "test.userdetails" }
The following command will import the database backup in the myinfo folder under the dump folder to the mongod instance running on the localhost interface. Here is the command. Here we mention the folder name, so the database backup from the mention folder will be imported.
D:\mongodb\bin>mongorestore dump/myinfo
Here is the output
D:\mongodb\bin>mongorestore dump/myinfo
connected to: 127.0.0.1
2015-04-27T11:00:54.570+0530 dump/myinfo\userdetails.bson
2015-04-27T11:00:54.572+0530    going into namespace [myinfo.userdetails]
Restoring to myinfo.userdetails without dropping. Restored data will be inserted without raising errors; check your server log
1 objects found
2015-04-27T11:00:54.581+0530    Creating index: { key: { _id: 1 }, name: "_id_", ns: "myinfo.userdetails" }
Restore Backups to Non-Local mongod Instances
The mongorestore command by default connects to a MongoDB instance running on the localhost interface with default port (27017). We can also restore the backup to a different host or port by using the --host and --port options.
Here is the command.
mongorestore --host [host name] --port 3017 --username [user] --password [password] [backup folder path of local machine]
for example, the path of the folder  like :   /backup_data/backup/
Collection Import using mongoimport
The command mongoimport restores a database from a backup taken with mongoexport.
Here in the example assume that our backup file name is newuserdetails.JSON, db name is myinfo and collection name is userdetails. In the following example, mongoimport imports the data in the JSON data from the newuserdetails.json file into the collection userdetails in the myinfo database.
D:\mongodb\bin>mongoimport --db myinfo --collection userdetails --file newuserdetails.json
Here is the output
D:\mongodb\bin>mongoimport --db myinfo --collection userdetails --file newuserdetails.json
connected to: 127.0.0.1
2015-04-27T11:53:12.880+0530 insertDocument :: caused by :: 11000 E11000 duplicate key error index: myinfo.userdetails.$_id_  dup key: { : ObjectId('553a1e0f195e5fc01733c693') }
2015-04-27T11:53:12.883+0530 insertDocument :: caused by :: 11000 E11000 duplicate key error index: myinfo.userdetails.$_id_  dup key: { : ObjectId('553b8e2bf11d4abcb967a704') }
2015-04-27T11:53:12.884+0530 imported 2 objects
Import JSON to Remote Host Running with Authentication
The mongoimport command can also be used to import data on a remote MongoDB database with authentication enabled. Here in the example below the mongoimport imports the data from the file \backup_data\backup\newuserdetails.json into the collection userdetails within the database myinfo in a remote MongoDB database
Here is the command.
mongoimport --host [host name] --port 37017 --username [user] --password [password] --collection userdetails --db myinfo --file \backup_data\backup\newuserdetails.json
CSV Import
The mongoimport can imports the csv formatted data into the collection. An option --headerline is used to instructs mongoimport to determine the name of the fields using the first line in the CSV file.
Here in the example assume that our backup file name is userdetails.csv located in the folder \backup_data\backup\, db name is myinfo and collection name is userdetails.
D:\mongodb\bin>mongoimport --db myinfo --collection userdetails --type csv --headerline --file /backup_data/backup/userdetails.csv
Here is the output
D:\mongodb\bin>mongoimport --db myinfo --collection userdetails --type csv --headerline --file /backup_data/backup/userdetails.csv
connected to: 127.0.0.1
2015-04-27T12:49:55.984+0530 imported 1 objects
Here in the example below no collection name have been specified and an option --ignoreBlanks which will ignore the blank columns have been specified.
D:\mongodb\bin>mongoimport --db myinfo --type csv --headerline --ignoreBlanks --file /backup_data/backup/userdetails.csv
Here is the output
D:\mongodb\bin>mongoimport --db myinfo --type csv --headerline --ignoreBlanks --file /backup_data/backup/userdetails.csv
connected to: 127.0.0.1
no collection specified!
using filename 'userdetails' as collection.
2015-04-27T12:52:21.794+0530 imported 1 objects
PREV :
MongoDB Dot notation
NEXT :
MongoDB DRIVER Java DRIVER