Exporting and importing data between MySQL and Microsoft excel
Installing and Configuring
Import and export data between MySQL and Excel has become much easier in Excel 2007 than it's previous versions. To explore the feature, you need to install MySQL For Excel.
You can install the MySQL For Excel component while installing MySQL Community Server 6. Or you may install it as an add-on upon your existing MySQL Server installation. Installation of this component has some prerequisites, though.
MySQL for Excel Requirements
You must have following installed on your machine for installing MySQL For Excel Installer :
-
.NET Framework 4.0 (Client or Full Profile).
-
Microsoft Office Excel 2007 or greater, for Microsoft Windows.
-
Visual Studio Tools for Office 4.0 and MySQL Installer may install this for you.
-
An available MySQL Server connection.
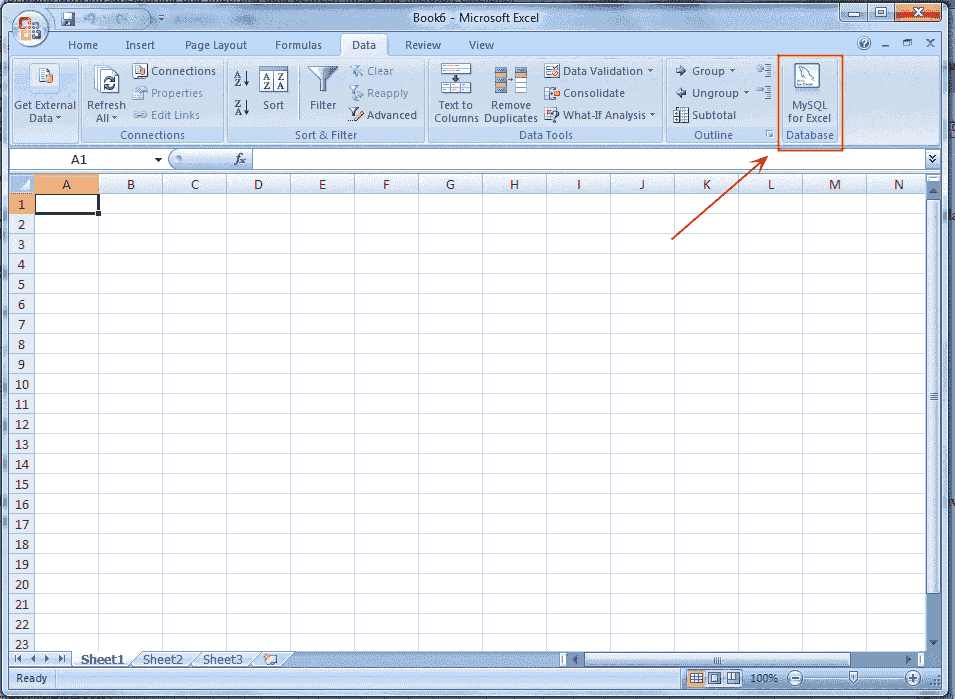
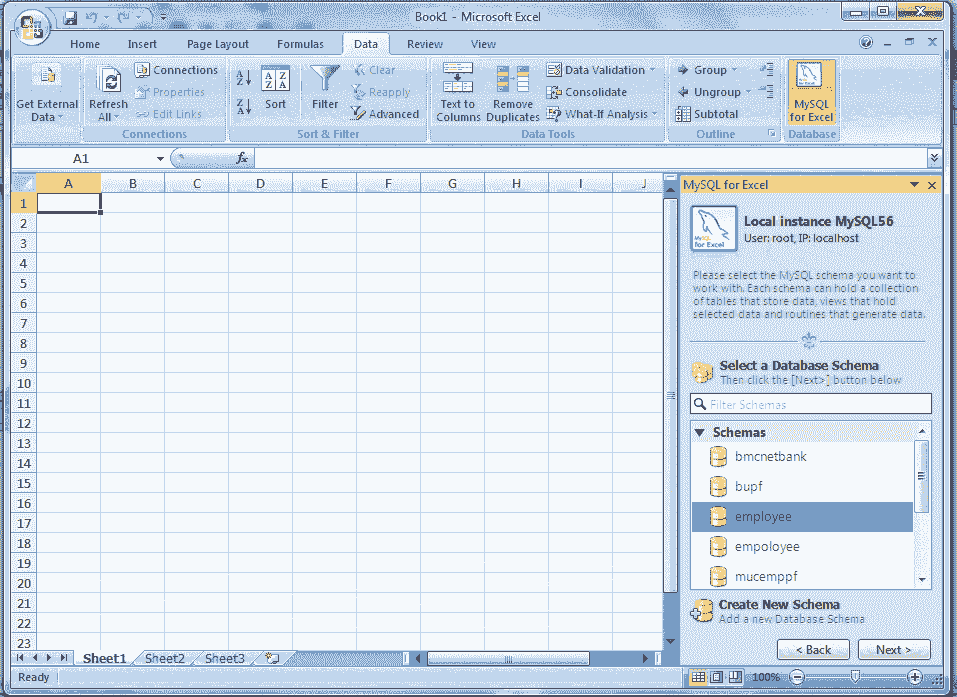
MySQL for Excel is loaded and executed by selecting the Data menu tab in Excel, and then choosing the "MySQL for Excel" Database icon. This opens a new Excel sidebar with the available MySQL for Excel options. The navigation bar with the MySQL for Excel icon is shown in the following screen shot:
Edit MySQL Data in Excel
MySQL for Excel enables you to load and edit MySQL data directly from Microsoft Excel, or yon can do it manually by pressing Commit Changes.
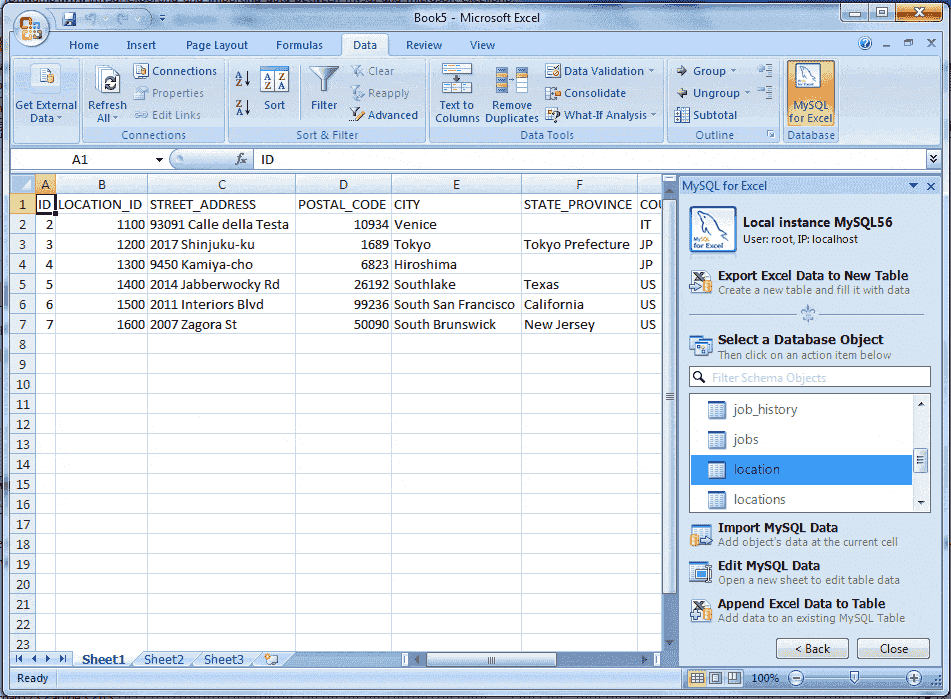
The example below uses the location table of the example employee database, but the screen will look the same for any table. Within MySQL for Excel, Open a MySQL Connection, click the employee schema, Next, select the location table, click Edit MySQL Data, then choose Import to import the data into a new Microsoft Excel worksheet for editing.
Here is the step by step guide to editing and commit the data:
Step 1:
Load Microsoft Office Excel 7

Step 2:
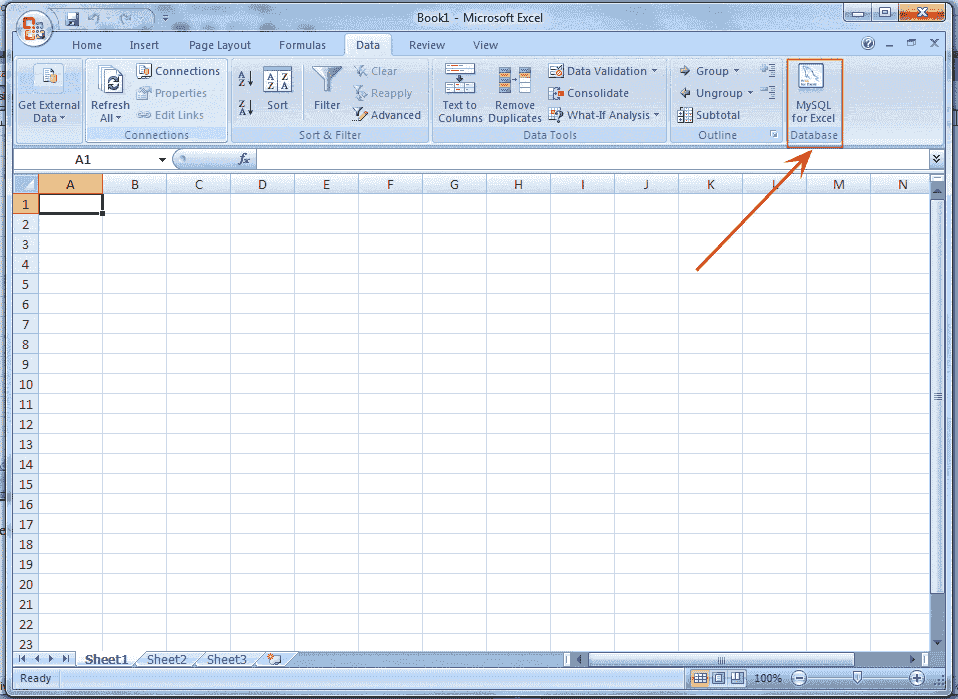
Click on Data Tab, see the above picture, the" MySQL for Excel" Database icon will appear shown below.
Step 3:
Click on "MySQL for Excel" Database icon. It opens a new Excel sidebar with the available MySQL for Excel options. The navigation bar with the MySQL for Excel icon is shown in the following picture.:
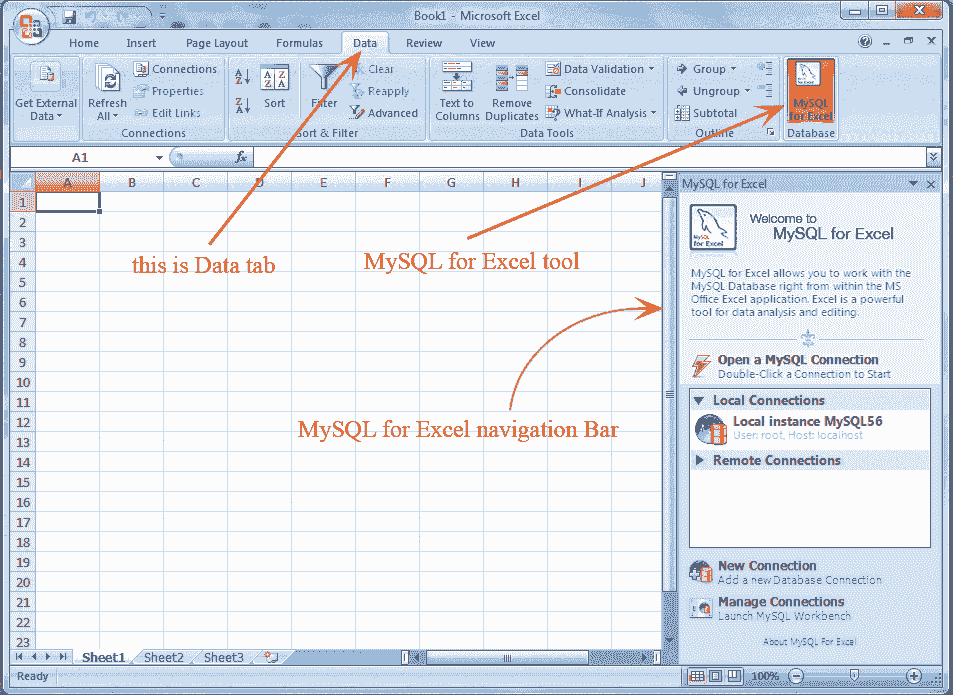
Here our Database is employee and we are working with location table, but the screen will look the same for any table.
Step 4:
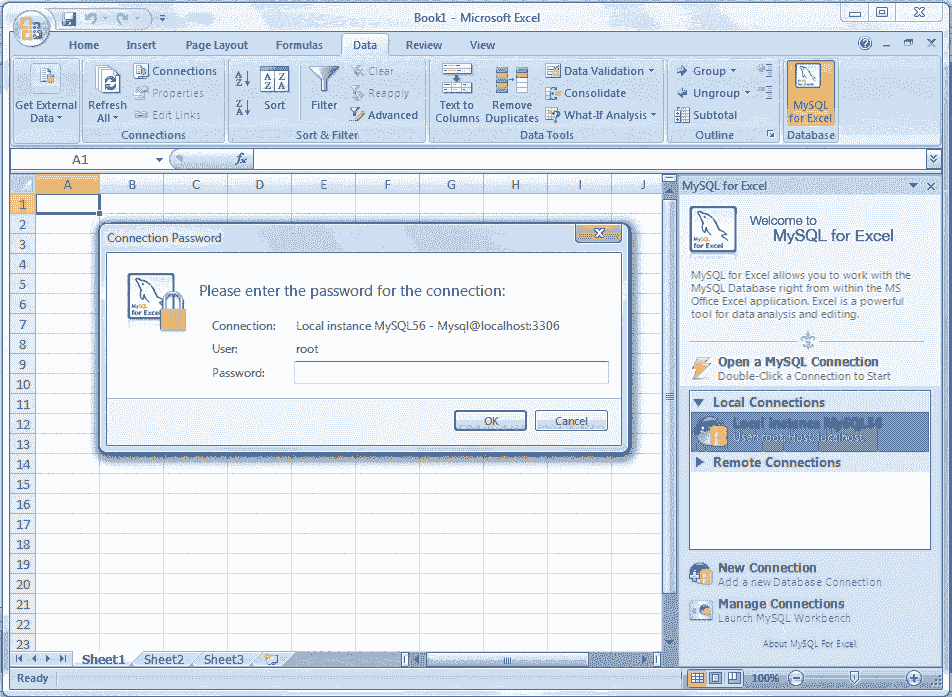
Within MySQL for Excel sidebar open a MySQL connection by double clicking. Here our connection is Local instance MySQL5.6 and with the following screen will appear for accepting the password.
Step 5:
Enter password for connection with MySQL server. The databases will show in MySQL for Excel sidebar. Our Database is employee. See the following picture.
Step 6:
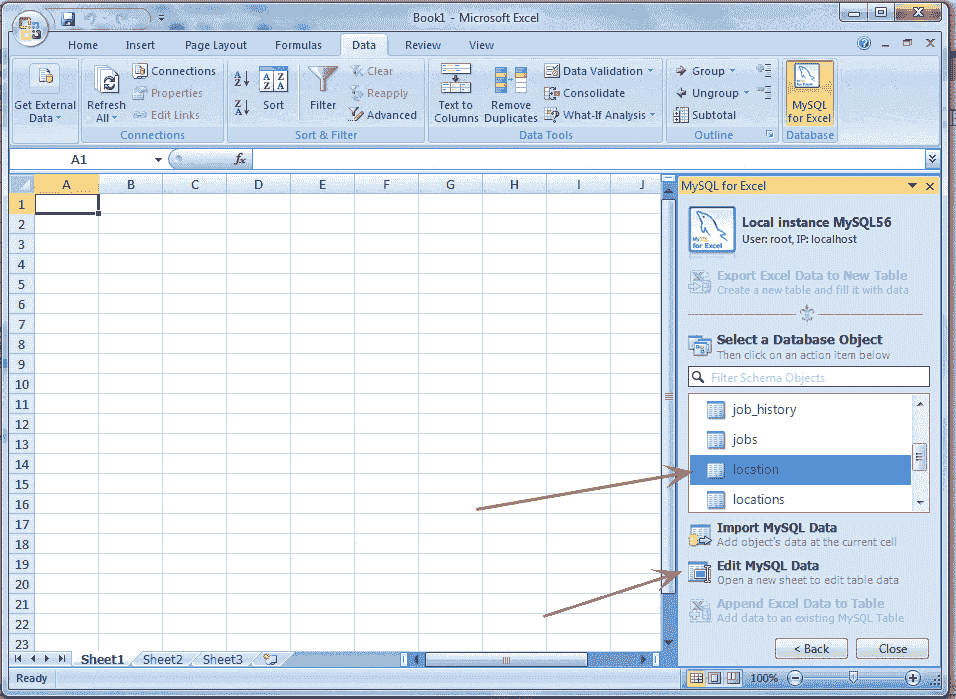
Double click on your desire database, and the tables within the database will display. Our table is location. See the following picture.
Step 7:
Select the table which you want to edit, click "Edit MySQL Data" inside the navigation bar as shown above, and see the following screen shot.
Step 8:
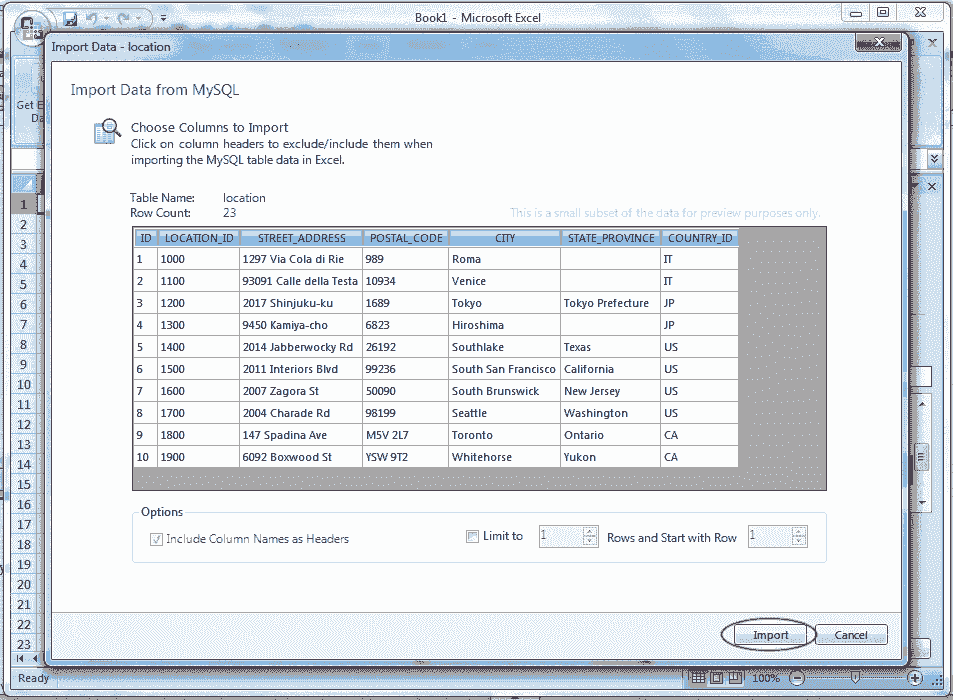
Click on Import button as mention in the above picture, and watch the following screen shot. The data of the selected table will appear and if you place the cursor on the data range the Revert Data and Commit Changes button ( specified by a red color rectangle ) will appear otherwise not.

Step 9:
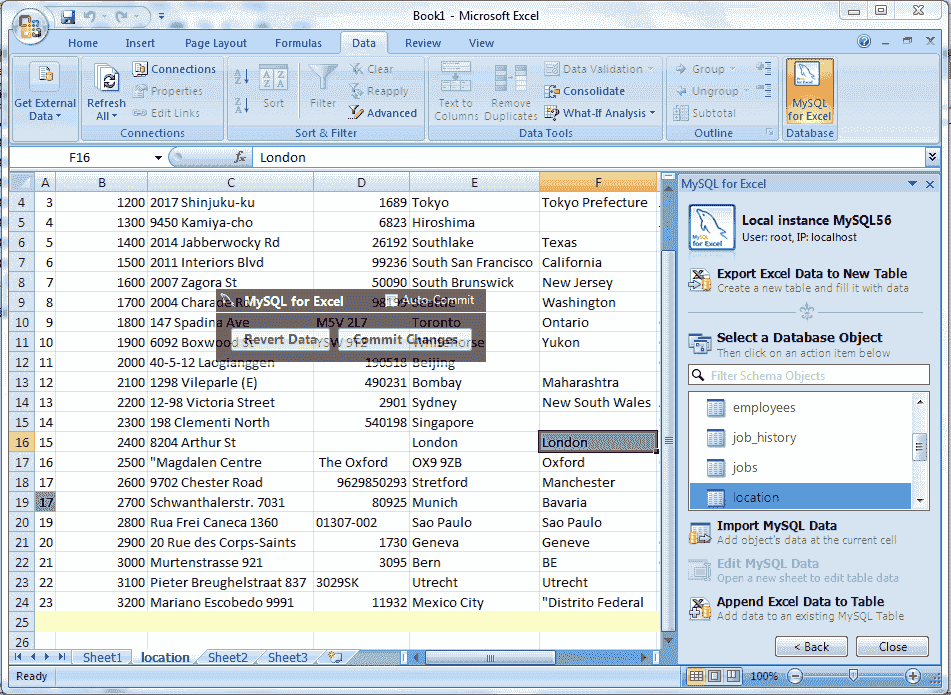
Here at our table, the first column ID is a primary key. If we change the value of ID in A19 cell 17 instead of 18 and press enter key the color of this cell will be green. Now we have changed the value of F16 cell is London and press enter key the cell color will change into green, and the color yellow at the last, indicate that the cells that accept new data. Data entered here is inserted into the MySQL table.
Step 10:
Now if we click the Revert Data button, watch the following screen shot.
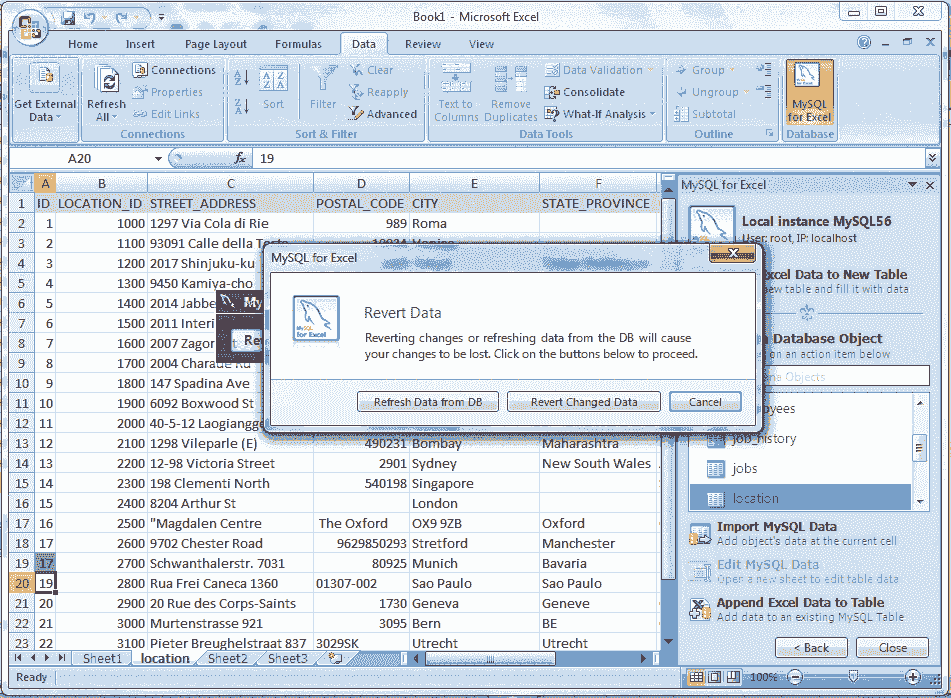
Here in above picture if you click the Refresh Data from DB the data will be refresh and display the original data from DB, and if you click on Revert Changed Data, you will loose your changes just made. In this stage, if you click on Commit Changes button look the following screen shot.
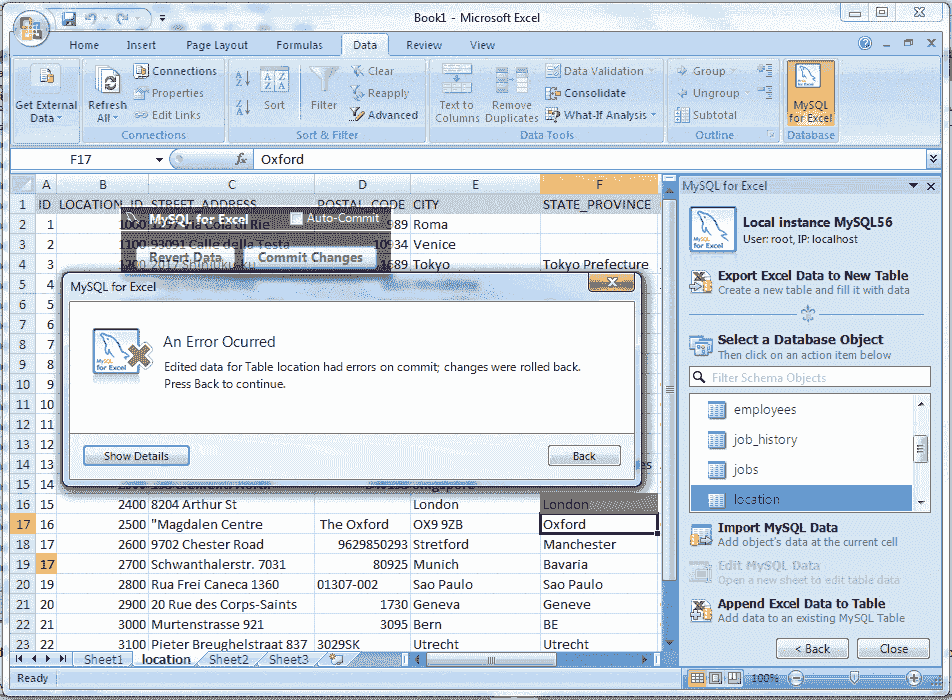
Here in the above picture, you are looking an error message, and the color of A19 cell changed from green to red, that is because the ID column is the primary key and the uniqueness have been violated here. Now we returned the value of A19 cell in its original value, i.e. 18, and click on Commit Changes button, and now look the below screen shot.
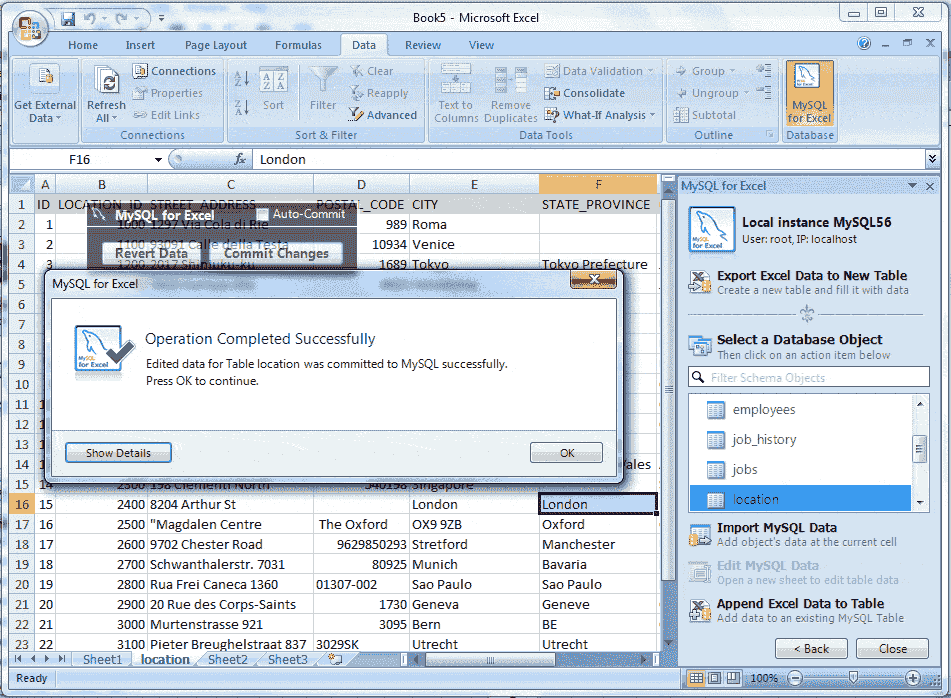
In the above picture shows the color of cell F16 have converted from green to blue, that means Commit Changes done successfully. Now you can close the Excel window saving or not but the database table has been updated. You can see it to do the step again. If you checked the Auto Commit check box, the effect immediately is seen in your sheet and data will be updated in MySQL database.
Import MySQL Data into Excel
Data can be imported from MySQL into a Microsoft Excel spreadsheet by using the Import MySQL Data option after selecting either a table, view, or procedure to import.
First of all, you do the first 6 steps describe above in "Edit MySQL Data in Excel" then select your table which you want to import. Here our table is location. So select the location table and then click "Import MySQL Data" and look the appeared screen shot here in the below.
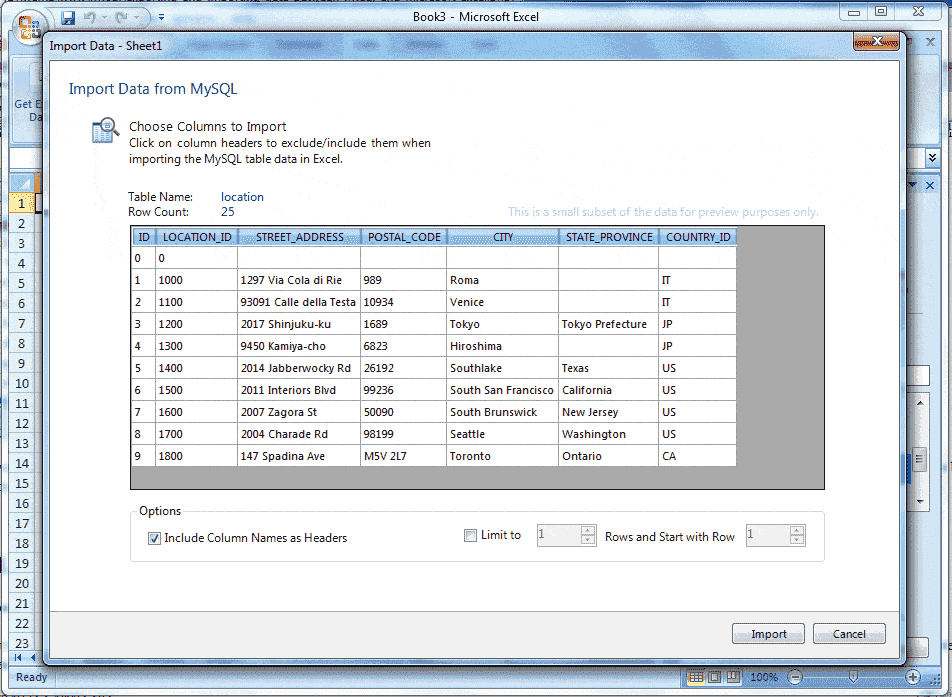
Choosing columns to import
By default, all columns are selected and will be imported. Specific columns may be selected (or unselected) using the standard Microsoft Windows method of either Control + Mouse click to select the individual columns, or Shift + Mouse click to select a range of columns.
The background color white indicates, the column or columns have been selected and they are ready to be imported, on the other hand, the gray color indicates that the columns are not selected and the column will not be imported.
Right-clicking anywhere in the preview grid opens a context-menu with either a Select None or Select All option, depending on the current status.
Importing Table
Include Column Names as Headers: By default, this option is enabled, and this treats the column names at the top of the Microsoft Excel spreadsheet as a "headers" row and will be inserted as a header.
Limit to and Rows and Start with Row : By default, this option is disabled if enabled, this limits the range of imported data. The Limit to option defaults to 1 and this limit can be changed by defines the number of rows to import. The Start with Row option defaults to 1, i.e. starting from the first row, and it can be changed by defines the number from where the import begins. Each option has a maximum value of COUNT(rows) in the table.
Now assumed that we want to import the columns LOATION_ID and CITY. Click the mouse on LOCATION_ID column and then press and hold CTRL key and click on CITY column, and look the following screen shot.
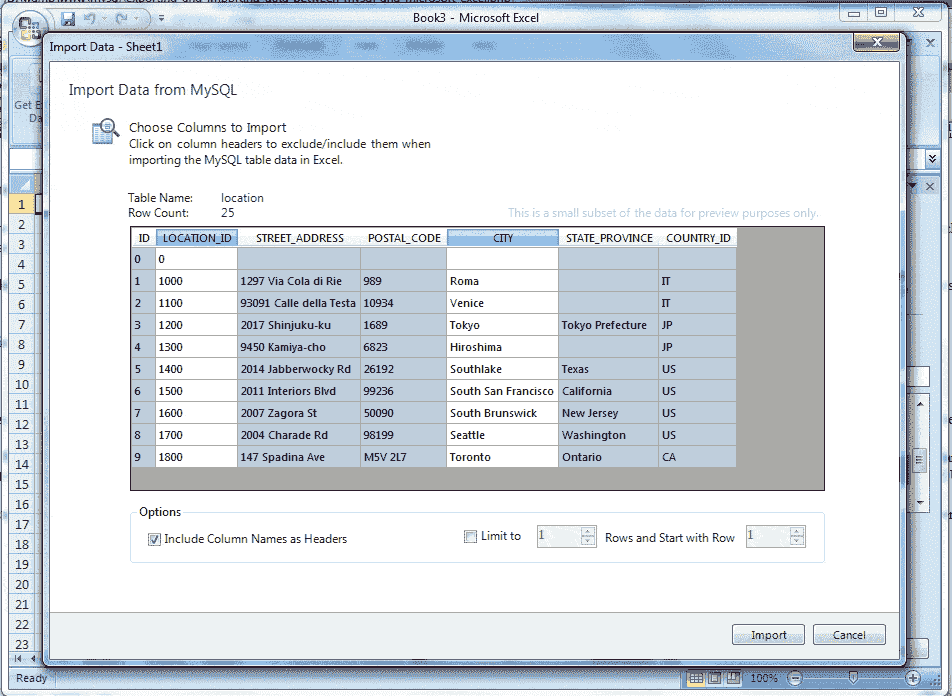
Now if we click the Import button all the rows for this two columns will be imported in Microsoft Excel Worksheet.
Assumes that, we want to import only 6 rows beginning from the 3rd row. Now look the following screen shot.
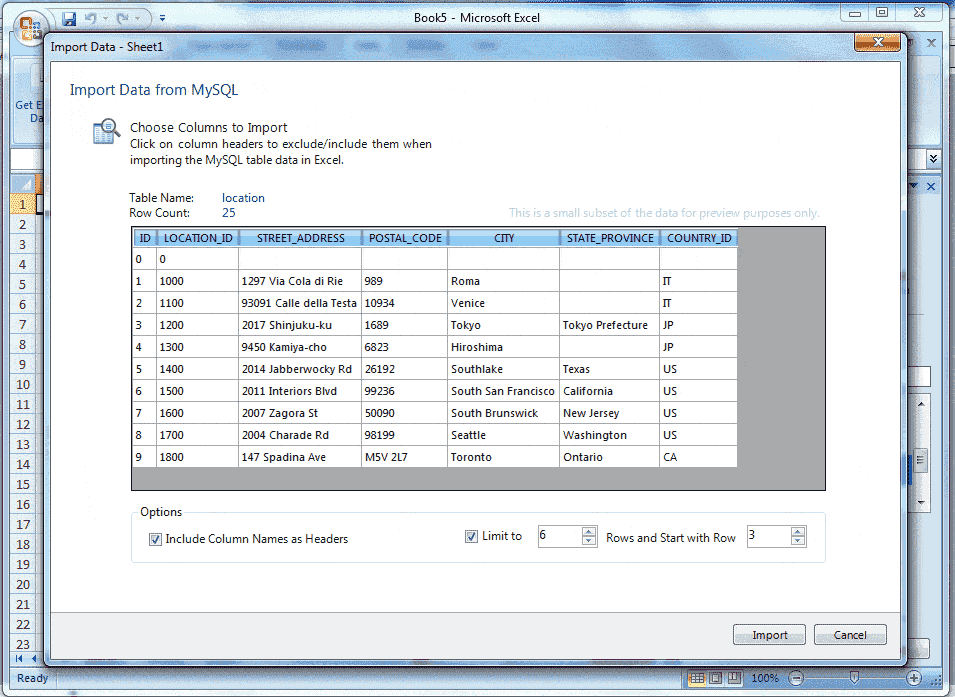
Here in the above picture shows all the columns have selected and the value of Limit to is 6, that means a number of 6 rows will be imported and the beginning of importing will start from the 3rd row because we have set the value of Start with Row is 3. Now click the Import button and look the following screen shot.
Append Excel Data into MySQL
The Microsoft Excel spreadsheet data can be appended to a MySQL database table by using the Append Excel Data to Table option.
Column mappings
Mapping the Excel columns to the MySQL columns can be executed automatically (default), manually, or by using a stored mapping routine. To append the data from Excel toMySQL the following step to be followed:
At first do th e above 6 steps of "Edit MySQL Data in Excel" then input records in excel spreadsheet compatible to the structure of MySQL table in which you want to append the records. Here is the example in which we have taken only one row, you may take more than one rows and then select the records. See the following screen shot.
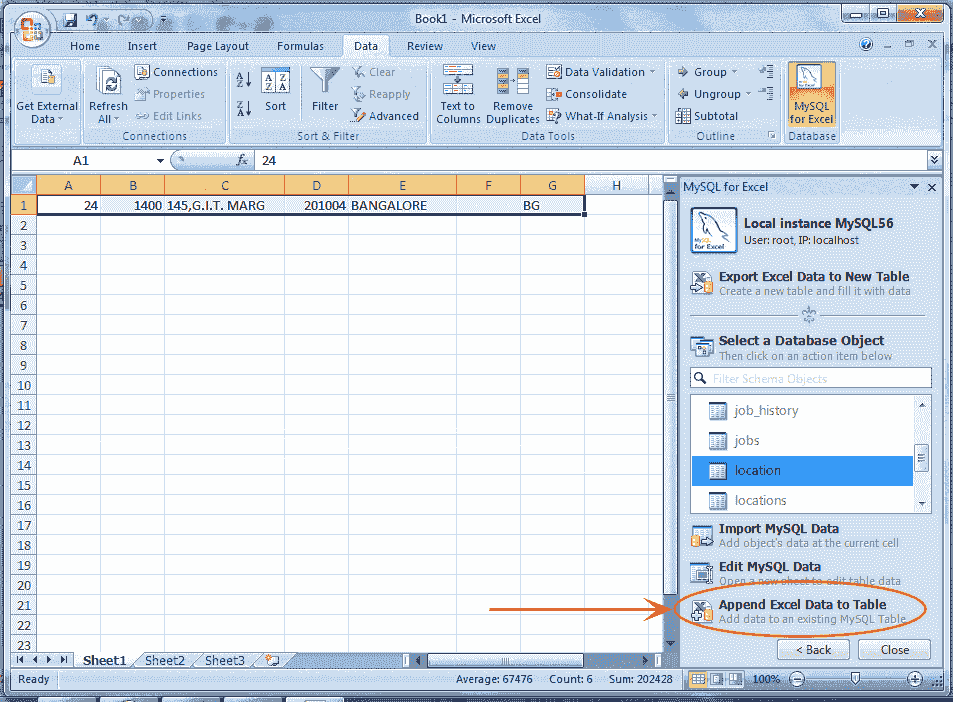
Now click on the Append Excel Data to Table as mention above, and look the screen like.
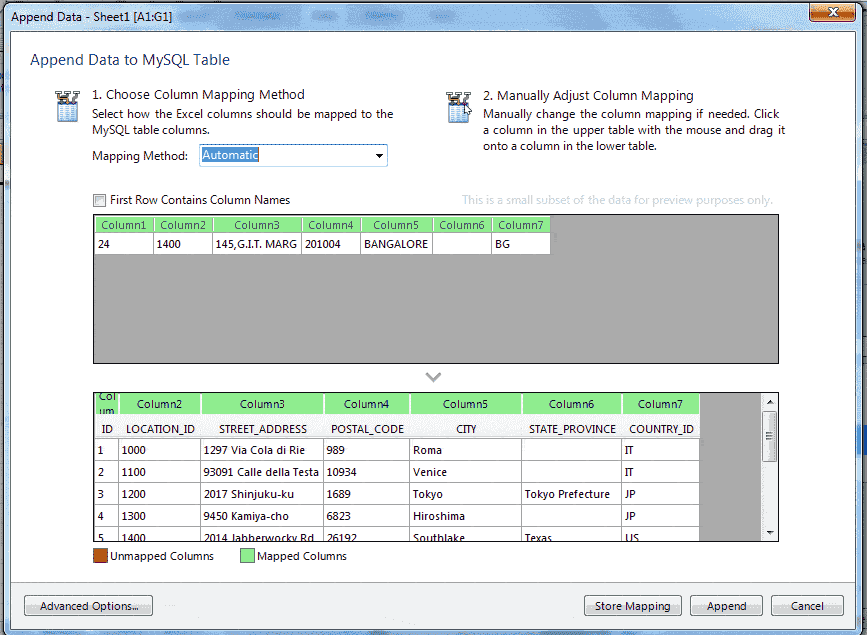
Here in the above picture, you are looking two colors for the legend. One is Red and another is Green.
The Green color indicate that a source column is mapped ( mapped means the source columns in above grid created in the spreadsheet have been matched with structure of the MySQL table as target columns shown in below grid ) to a target column and here in the above picture shows all the source columns have been mapped with target columns.
If you drag any target column heading backed by green color and leave it in outside the grid, the color of the target column will be Red and the color of the source column will be Gray. See in below picture.
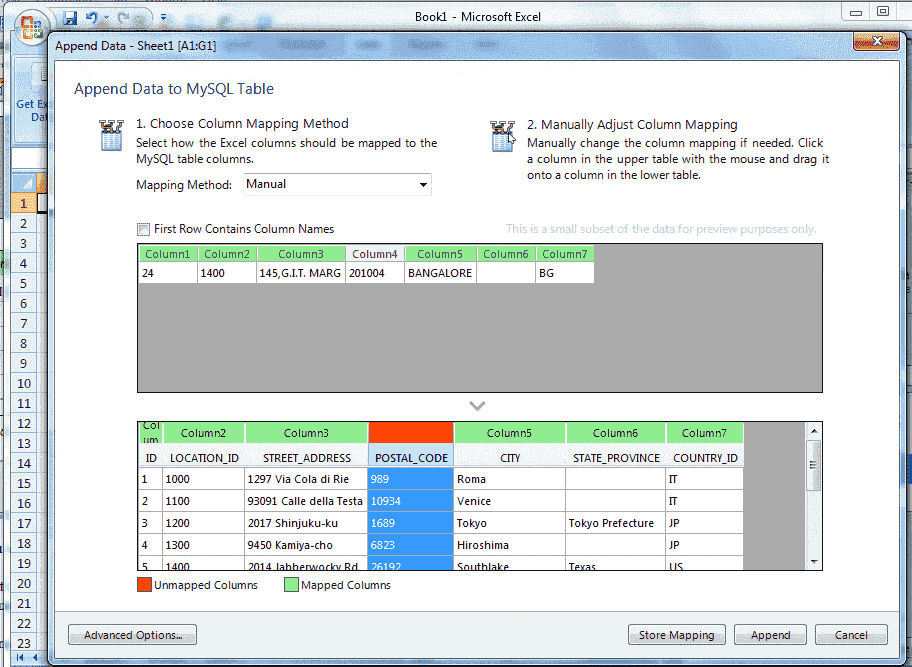
Here in the above picture, the target column4 became Red and source column4 became Gray.
The Red color indicates that a target column is not mapped and the Gray color indicate that, a source column is not mapped.
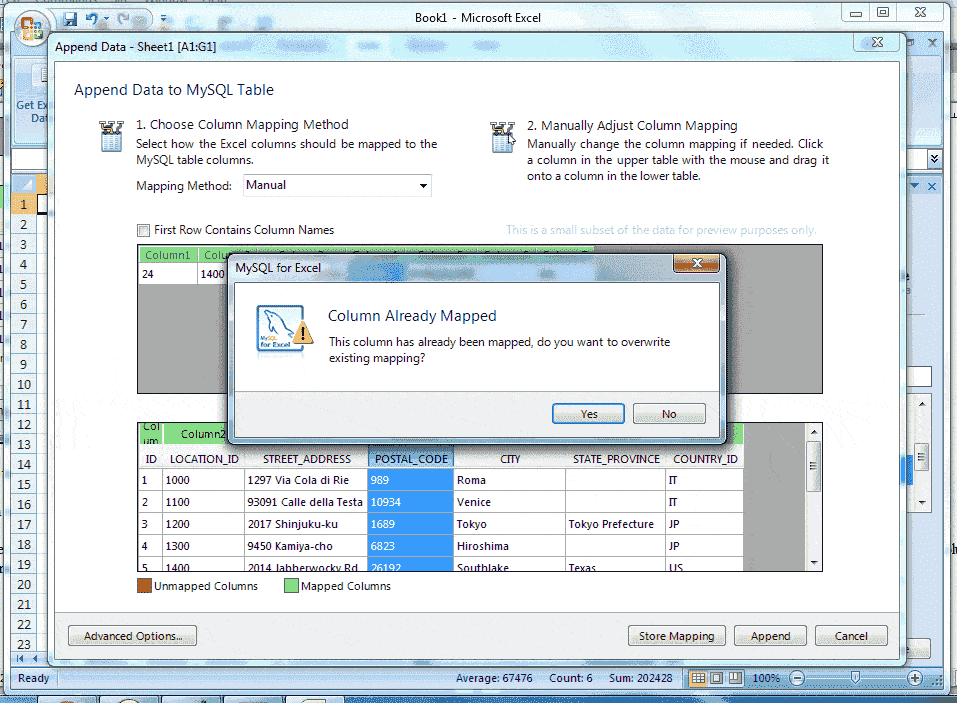
It is to be noted that, a source column may be mapped to multiple target columns, although this action generates a warning dialog and right-clicking on a target column shows a menu with options to either Remove Column Mapping for a single column or to Clear All Mappings for all columns.
Suppose, we are mapping manually by dragging source column4 with target column4 and column5. The target column4 will be mapping simply but when doing the process for target column5 the warning dialog will appear, show below.
Mapping methods
Here look the three mapping methods:
The automatic mapping method attempts to match the Excel source column names with the MySQL target table column names.
In the manual mapping method, source column names are manually dragged with the target column names. After the Automatic method is selected the Manual dragging method can also be performed.
You may store your own mapping styles using the Store Mapping button and saved a name like "name (dbname.tablename)" and it will be available in the Mapping Method combo box.
Stored mappings may be deleted or renamed within the Advanced Options dialog.
Advanced Options
If we click the Advanced Options button the dialog looks similar to:
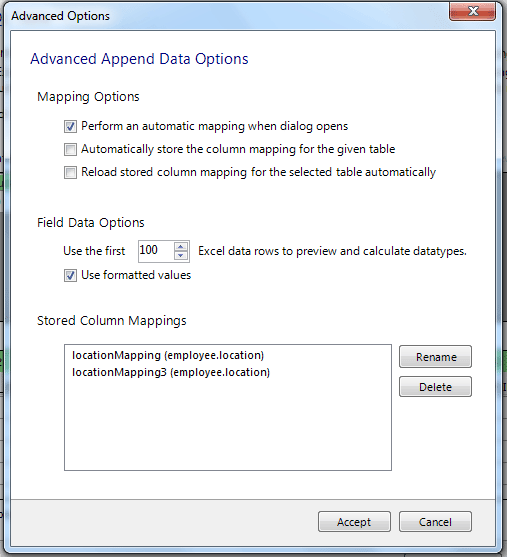
Perform an automatic mapping when the dialog opens: By this options, it happens automatically to map the target and source when the Append Data dialog is opened.
Automatically store the column mapping for the given table:To check this option, stores each mapping routine after executing the Append operation. The mapping routine is saved using the "tablenameMapping (dbname.tablename)" format. It can be performed manually by using the Store Mapping button.
Reload stored column mapping for the selected table automatically: If a stored mapping routine exists which matches all column names in the source grid with the target grid, then it is automatically be loaded.
The advanced Field Data Options:
Use the first 100 (default) Excel data rows to preview and calculate data types. This determines the number of rows that the preview displays, and the values that affect the automatic mapping feature.
When you check the Use formatted values, the data from Excel is treated as Text, Double, or Date. This is enabled by default. If we make it disabled, the existing data is never treated as a Date type, so for example, this means that a date may be represented as a number.
The Stored Column Mappings is a list of saved column mappings that were saved with the "Automatically store the column mapping for the given table" feature, or manually with the Store Mapping option.
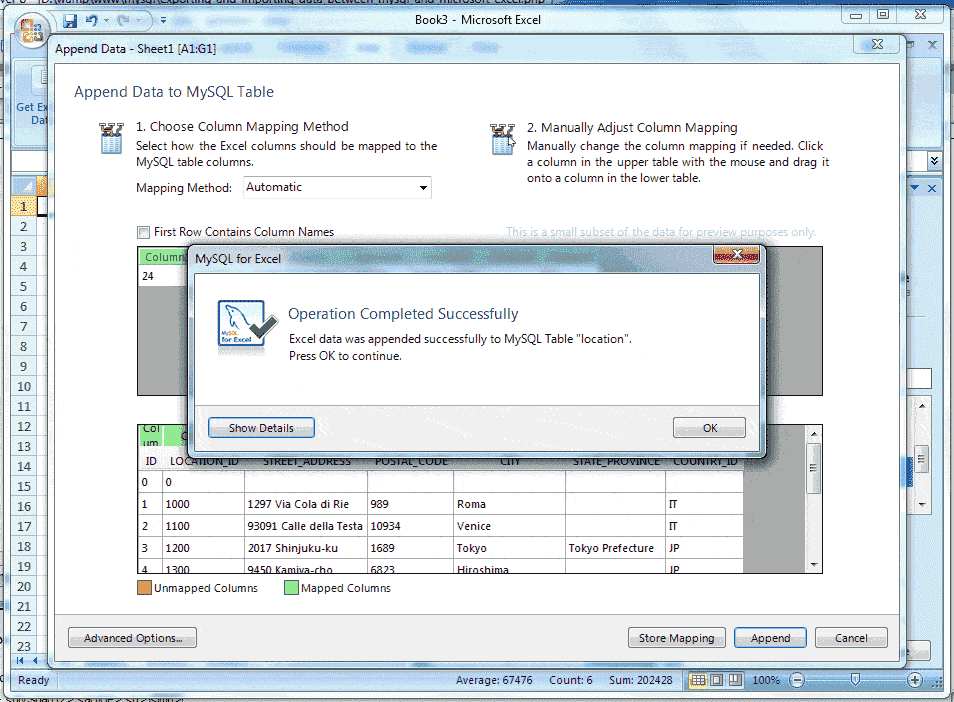
After completion all the steps if we click Append button the following screen will appear.
Export Excel Data into MySQL
Microsoft Excel spreadsheet's data can be exported to a new MySQL database table by using the Export Excel Data to New Table option. At first, you do the first 6 steps above describe in Edit MySQL Data in Excel . Then enter some records with heading as you wish, into your Excel spreadsheet and select the records. Now look the sample records in the following picture -
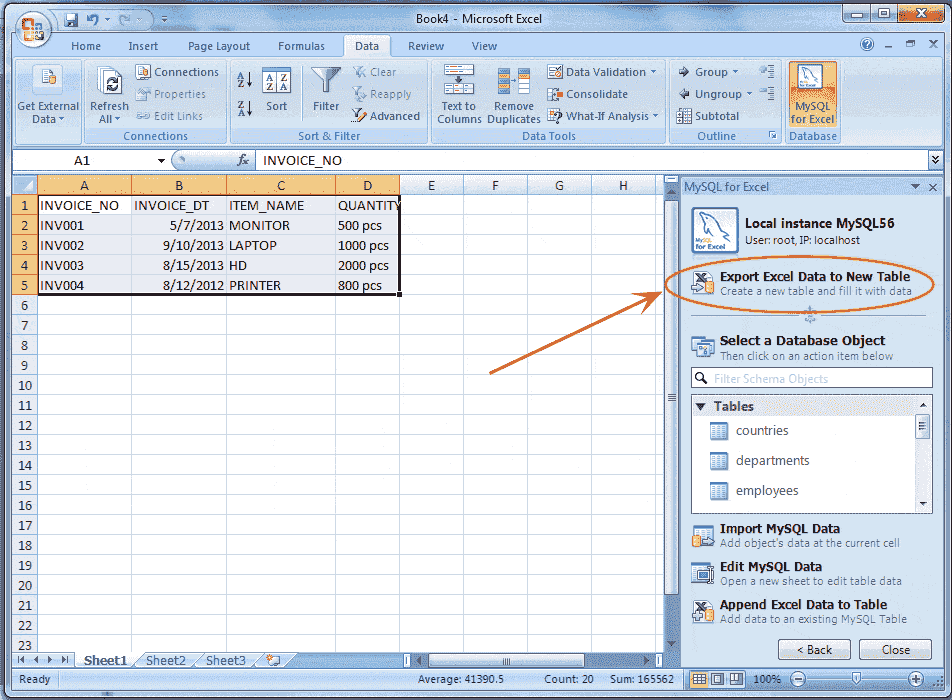
Now click on Export Excel Data to New Table mention by the arrow in the above picture and look the following screen.
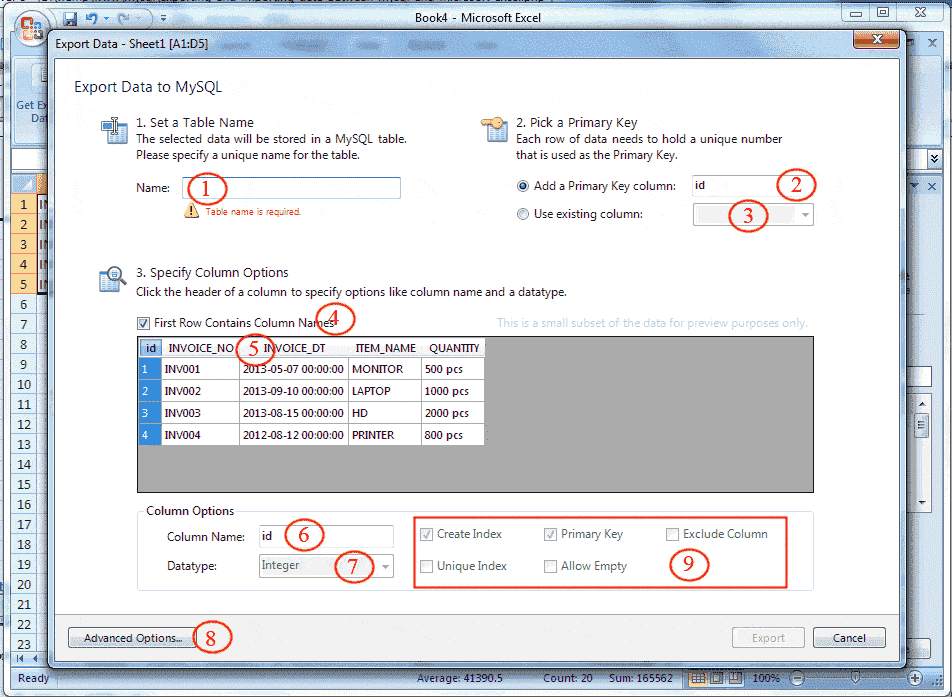
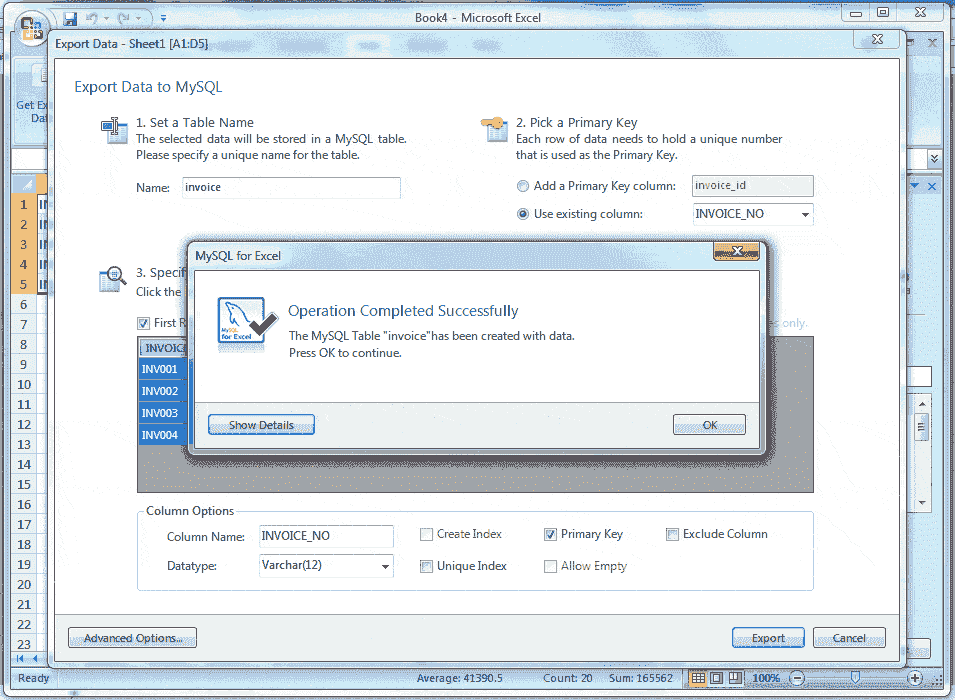
1 - Specify a unique name for the MySQL table. Suppose the name of the MySQL table is "invoice"
2 - If Add a Primary Key column radio button is checked an additional primary key column will be add, you can change the name of the column and by default, the data type will be an integer which is displaying in 7.
3 - When you check the Use Existing Columns radio button the column names will the available in the combo box and you can choose the primary key column from the list, and the column will be selected. Suppose you selected INVOICE_NO column, look the following picture.
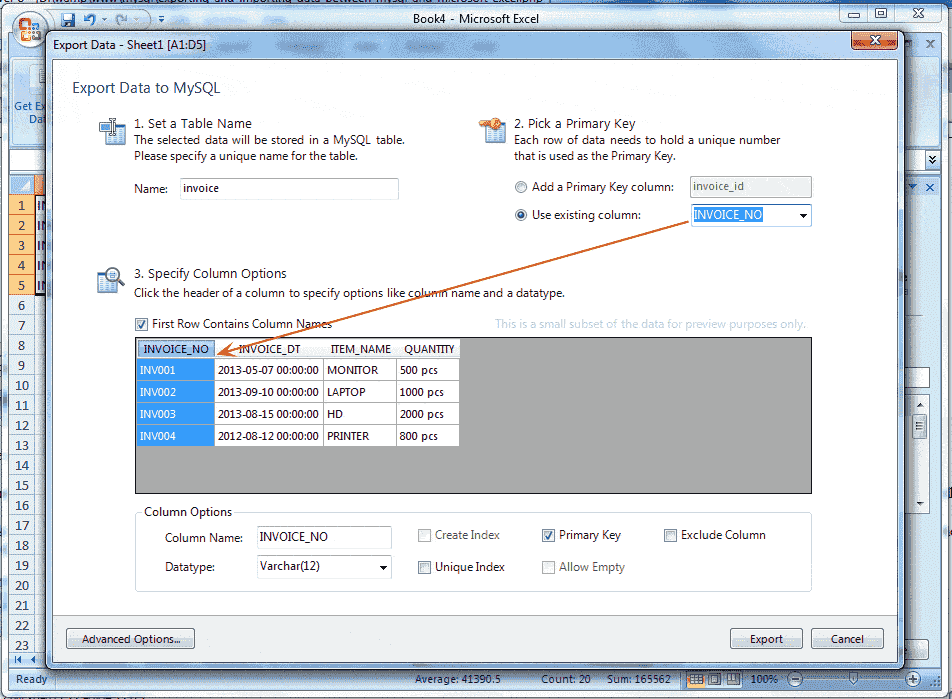
Here in the above picture, the INVOICE_NO column has been selected and now you can change the Column Name (point 6), Data type (point 7) and the constraint (point 9) which are active.
4 - If you check the check box First Row Contains Column Names (point 4) the first column in your excel data will be heading otherwise it will be column1,column2,... etc
5 - Suppose you change the Data type and column name for other columns you can click on the column heading. Assumed that we want to change the Data type of INVOICE_DT, click on INVOICE_DT, and this column will be selected and then you can use point 6,7 and 9.
6 - You can change the Column Name.
7 - You can change the Data type
8 - Advance Option shows the following dialog.
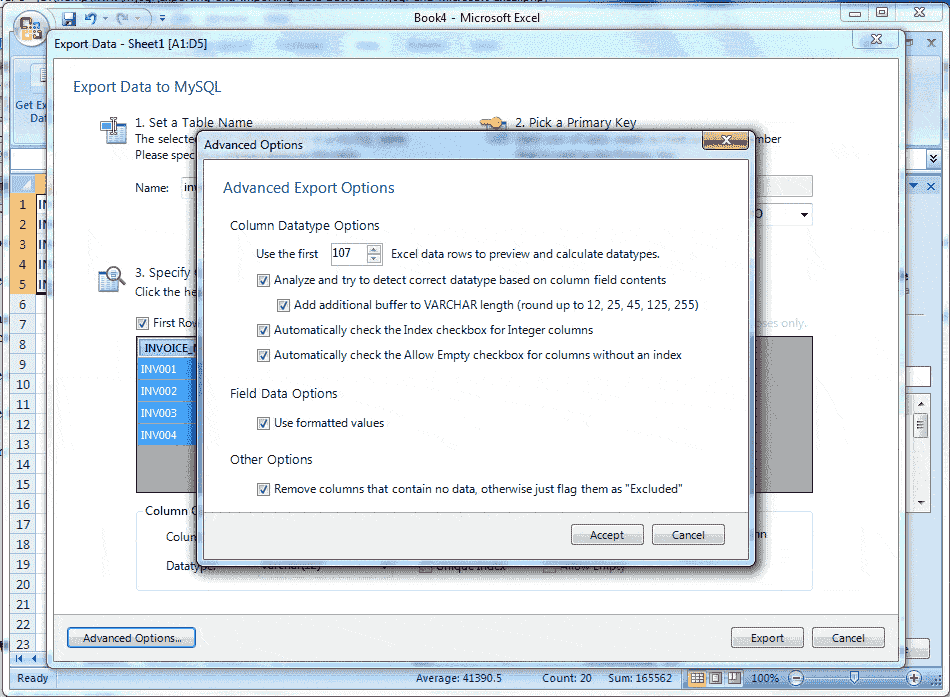
Advanced Options
Use the first 100 (default) Excel data rows to preview and calculate data types: This option determines the number of rows that the preview displays and the specified values affect the feature of automatic mapping.
Analyze and try to detect correct data type based on column field contents: This option try to analyze the data and determine the data type for the column. When the column contains multiple types of data then it defined as VARCHAR.
Add additional buffer to VARCHAR length (round up to 12, 25, 45, 125, 255): When it is enabled, it detects the data type automatically and set to VARCHAR, then it find the maximum length for all rows within the column, and rounds it up the maximum length to one of the defined lengths above and when disabled, then the VARCHAR length is set to the length of the longest entry in the Excel spreadsheet.
Automatically check the Index checkbox for Integer columns: By default, this option is enabled , and then columns with an Integer data type will have the Create Index option enabled by default.
Automatically check the Allow Empty checkbox for columns without an index: By default, this option is enabled, and when enabled the columns without the Create Index checkbox checked will automatically enable the Allow Empty configuration option.
Use formatted values: By default, this option is enabled, and the data from Excel is treated as Text, Double, or Date but when disabled the data's are independent, that is they have no specific data type.
Remove columns that contain no data, otherwise flag them as "Excluded": When this option is enabled, columns without data in Excel are removed and not shown in the preview panel. By default, this option is disabled and then these columns will exist but have the Exclude Column option checked.
After completion, all setting click Export button the and see the following screen shot -
PREV :
MySQL DROP
NEXT :
MySQL backup and restore