Authoring Schematics
You can create your own schematics to operate on Angular projects. Library developers typically package schematics with their libraries in order to integrate them with the Angular CLI. You can also create stand-alone schematics to manipulate the files and constructs in Angular applications as a way of customizing them for your development environment and making them conform to your standards and constraints. Schematics can be chained, running other schematics to perform complex operations.
Manipulating the code in an application has the potential to be both very powerful and correspondingly dangerous. For example, creating a file that already exists would be an error, and if it was applied immediately, it would discard all the other changes applied so far. The Angular Schematics tooling guards against side effects and errors by creating a virtual file system. A schematic describes a pipeline of transformations that can be applied to the virtual file system. When a schematic run, the transformations are recorded in memory, and only applied in the real file system once they're confirmed to be valid.
Schematics concepts
The public API for schematics defines classes that represent the basic concepts.
- The virtual file system is represented by a Tree. The Tree data structure contains a base (a set of files that already exists) and a staging area (a list of changes to be applied to the base). When making modifications, you don't actually change the base, but add those modifications to the staging area.
- A Rule object defines a function that takes a Tree, applies transformations, and returns a new Tree. The main file for a schematic, index.ts, defines a set of rules that implement the schematic's logic.
- A transformation is represented by an Action. There are four action types: Create, Rename, Overwrite, and Delete.
- Each schematic runs in a context, represented by a SchematicContext object.
The context object passed into a rule provides access to utility functions and metadata that the schematic may need to work with, including a logging API to help with debugging. The context also defines a merge strategy that determines how changes are merged from the staged tree into the base tree. A change can be accepted or ignored or throw an exception.
Defining rules and actions
When you create a new blank schematic with the Schematics CLI, the generated entry function is a rule factory. A RuleFactory object defines a higher-order function that creates a Rule. The code snippet below illustrates more.
import { Rule, SchematicContext, Tree } from '@angular-devkit/schematics';

// You don't have to export the function as default.
// You can also have more than one rule factory per file.
export function helloWorld(_options: any): Rule {
 return (tree: Tree, _context: SchematicContext) => {
   return tree;
 };
}
Live Demo:
It is just a code snippet explaining a particular concept and may not have any output
See the Pen RuleFactory by w3resource (@w3resource) on CodePen.
Your rules can make changes to your projects by calling external tools and implementing logic. You need a rule, for example, to define how a template in the schematic is to be merged into the hosting project.
Rules can make use of utilities provided with the @schematics/angular package. Look for helper functions for working with modules, dependencies, TypeScript, AST, JSON, Angular CLI workspaces and projects, and more.
import {
  JsonAstObject,
  JsonObject,
  JsonValue,
  Path,
  normalize,
  parseJsonAst,
  strings,
} from '@angular-devkit/core';
Live Demo:
It is just a code snippet explaining a particular concept and may not have any output
See the Pen Uses if Rules by w3resource (@w3resource) on CodePen.
Defining input options with a schema and interfaces
Rules can collect option values from the caller and inject them into templates. The options available to your rules, with their allowed values and defaults, are defined in the schematic's JSON schema file, <schematic>/schema.json. You can define a variable or enumerated data types for the schema using TypeScript interfaces.
You can see examples of schema files for the Angular CLI command schematics in @schematics/angular
Schematics CLI
Schematics come with their own command-line tool. Using Node 6.9 or above, install the Schematics command line tool globally:
``npm install -g @angular-devkit/schematics-cli``
This installs the schematics executable, which you can use to create a new schematics collection in its own project folder, add a new schematic to an existing collection, or extend an existing schematic.
In the following sections, we will create a new schematics collection using the CLI in order to introduce the files and file structure, and some of the basic concepts.
The most common use of schematics, however, is to integrate an Angular library with the Angular CLI. You can do this by creating the schematic files directly within the library project in an Angular workspace, without using the Schematics CLI.
Creating a schematics collection
The following command creates a new schematic named hello-world in a new project folder of the same name.
`` `schematics blank --name=hello-world```'
The blank schematic is provided by the Schematics CLI. The command creates a new project folder (the root folder for the collection) and an initial named schematic in the collection.
Go to the collection folder, install your npm dependencies, and open your new collection in your favorite editor to see the generated files. For example, if you are using VSCode:
```
npm install
npm run build
code .
```
The initial schematic gets the same name as the project folder, and is generated in src/hello-world. You can add related schematics to this collection, and modify the generated skeleton code to define your schematic's functionality. Each schematic name must be unique within the collection.
Running a schematic
Use the schematics command to run a named schematic. Provide the path to the project folder, the schematic name, and any mandatory options, in the following format.
schematics<path-to-schematics-project>:<schematics-name> --<required-option>=<value>
Live Demo:
It is just a code snippet explaining a particular concept and may not have any output
See the Pen Running a schematics by w3resource (@w3resource) on CodePen.
The path can be absolute or relative to the current working directory where the command is executed. For example, to run the schematic we just generated (which has no required options), use the following command.
``` schematics .:hello-world ```
Adding a schematic to a collection
To add a schematic to an existing collection, use the same command you use to start a new schematics project, but run the command inside the project folder.
``` cd hello-world
schematics blank --name=goodbye-world ```
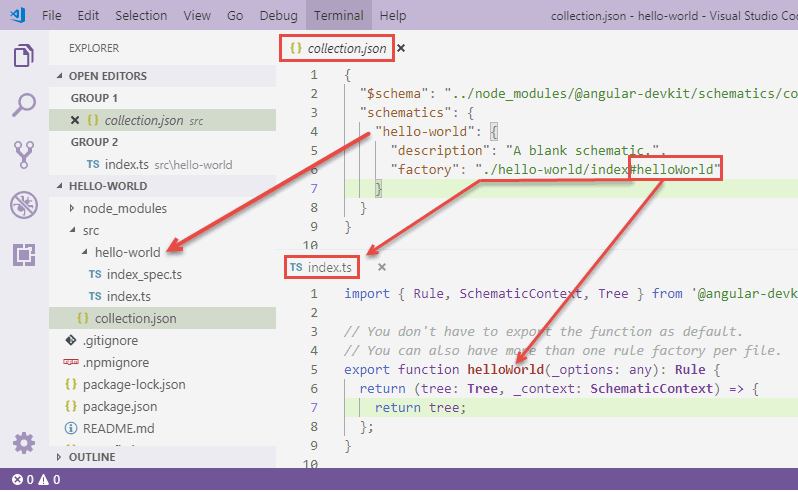
The command generates the new named schematic inside your collection, with a main index.ts file and its associated test spec. It also adds the name, description, and factory function for the new schematic to the collection's schema in the collection.json file.
Collection contents
The top level of the root project folder for a collection contains configuration files, a node_modules folder, and a src/folder. The src/ folder contains subfolders for named schematics in the collection, and a schema, collection.json, which describes the collected schematics. Each schematic is created with a name, description, and factory function.
{
  "$schema":
     "../node_modules/@angular-devkit/schematics/collection-schema.json",
  "schematics": {
    "hello-world": {
      "description": "A blank schematic.",
      "factory": "./hello-world/index#helloWorld"
    }
  }
}
Live Demo:
It is just a code snippet explaining a particular concept and may not have any output
See the Pen Collection contents by w3resource (@w3resource) on CodePen.
The $schema property specifies the schema that the CLI uses for validation.
- The schematics property lists named schematics that belong to this collection. Each schematic has a plain-text description, and points to the generated entry function in the main file.
- The factory property points to the generated entry function. In this example, you invoke the hello-worldschematic by calling the helloWorld() factory function.
- The optional schema property points to a JSON schema file that defines the command-line options available to the schematic.
- The optional aliases array specifies one or more strings that can be used to invoke the schematic. For example, the schematic for the Angular CLI "generate" command has an alias "g", allowing you to use the command ng g.
Named schematics
When you use the Schematics CLI to create a blank schematics project, the new blank schematic is the first member of the collection and has the same name as the collection. When you add a new named schematic to this collection, it is automatically added to the collection.json schema.
In addition to the name and description, each schematic has a factory property that identifies the schematic's entry point. In the example, you invoke the schematic's defined functionality by calling the helloWorld() function in the main file, hello-world/index.ts.
Previous: Service worker in production
Next:
Schematics