Template driven forms
It is becoming impractical to see a website without forms. In many business applications. Forms are required to register, login, submit a request form. Place an order, make a hotel reservation and much more. In developing a form, it's important to create a data-entry experience that guides the user efficiently and effectively through the workflow.
You can build forms by writing templates in the Angular template syntax with the form-specific directives and techniques described in this page.
You can build almost any form with an Angular template—login forms, contact forms, and pretty much any business form. You can lay out the controls creatively, bind them to data, specify validation rules and display validation errors, conditionally enable or disable specific controls, trigger built-in visual feedback, and much more.
Angular makes the process easy by handling many of the repetitive, boilerplate tasks you'd otherwise wrestle with yourself.
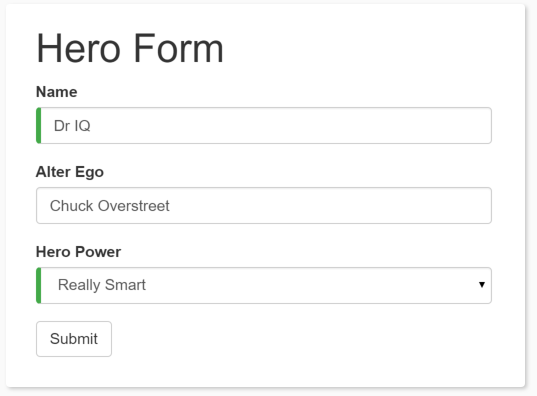
Our aim is to build a template-driven form that as shown below.

The Hero Employment Agency uses this form to maintain personal information about heroes. Every hero needs a job. It's the company mission to match the right hero with the right crisis.
Two of the three fields on this form are required. Required fields have a green bar on the left to make them easy to spot.
We’ll build this form in small steps:
- Create the Hero model class.
- Create the component that controls the form.
- Create a template with the initial form layout.
- Bind data properties to each form control using the ngModel two-way data-binding syntax.
- Add a name attribute to each form-input control.
- Add custom CSS to provide visual feedback.
- Show and hide validation-error messages.
- Handle form submission with ngSubmit.
- Disable the form’s Submit button until the form is valid.
Setup
Create a new project named angular-forms:
ng new angular-forms
Create the Hero model class
As users enter form data, you'll capture their changes and update an instance of a model. You can't lay out the form until you know what the model looks like.
A model can be as simple as a "property bag" that holds facts about a thing of application importance. That describes well the Hero class with its three required fields (id, name, power) and one optional field (alterEgo).
Using the Angular CLI command ng generate class, generate a new class named Hero:
ng generate class Hero
export class Hero {

  constructor(
    public id: number,
    public name: string,
    public power: string,
    public alterEgo?: string
  ) {  }

}
Create a form component
An Angular form has two parts: an HTML-based template and a component class to handle data and user interactions programmatically. Begin with the class because it states, in brief, what the hero editor can do.
Using the Angular CLI command ng generates component, generate a new component named HeroForm:
ng generate component HeroForm
This will generate
Hero-form.component.ts
TypeScript Code:
import { Component } from '@angular/core';

import { Hero }    from '../hero';

@Component({
  selector: 'app-hero-form',
  templateUrl: './hero-form.component.html',
  styleUrls: ['./hero-form.component.css']
})
export class HeroFormComponent {

  powers = ['Really Smart', 'Super Flexible',
            'Super Hot', 'Weather Changer'];

  model = new Hero(18, 'Dr IQ', this.powers[0], 'Chuck Overstreet');

  submitted = false;

  onSubmit() { this.submitted = true; }

  // TODO: Remove this when we're done
  get diagnostic() { return JSON.stringify(this.model); }
}
Live Demo:
It is just a code snippet explaining a particular concept and may not have any output
See the Pen hero-form.component.ts by w3resource (@w3resource) on CodePen.
Create an initial HTML form template
HTML Code:
<div class="container">
    <h1>Hero Form</h1>
    <form>
      <div class="form-group">
        <label for="name">Name</label>
        <input type="text" class="form-control" id="name" required>
      </div>

      <div class="form-group">
        <label for="alterEgo">Alter Ego</label>
        <input type="text" class="form-control" id="alterEgo">
      </div>

      <button type="submit" class="btn btn-success">Submit</button>

    </form>
</div>
Live Demo:
It is just a code snippet explaining a particular concept and may not have any output
See the Pen initial-form.html by w3resource (@w3resource) on CodePen.
Two-way data binding with ngModel
You don't see hero data because you're not binding to the Hero yet. You know how to do that from earlier pages. Displaying Data teaches property binding. User Input shows how to listen for DOM events with an event binding and how to update a component property with the displayed value.
Now you need to display, listen, and extract at the same time.
You could use the techniques you already know, but instead, you'll use the new [(ngModel)] syntax, which makes binding the form to the model easy.
Find the <input> tag for Name and update it like this:
<input type="text" class="form-control" id="name"
       required
       [(ngModel)]="model.name" name="name">
TODO: remove this: {{model.name}}
Hero-form-component.html
HTML Code:
{{diagnostic}}
<div class="form-group">
  <label for="name">Name</label>
  <input type="text" class="form-control" id="name"
         required
         [(ngModel)]="model.name" name="name">
</div>

<div class="form-group">
  <label for="alterEgo">Alter Ego</label>
  <input type="text"  class="form-control" id="alterEgo"
         [(ngModel)]="model.alterEgo" name="alterEgo">
</div>

<div class="form-group">
  <label for="power">Hero Power</label>
  <select class="form-control"  id="power"
          required
          [(ngModel)]="model.power" name="power">
    <option *ngFor="let pow of powers" [value]="pow">{{pow}}</option>
  </select>
</div>
Live Demo:
It is just a code snippet explaining a particular concept and may not have any output
See the Pen revised-hero-form-component.html by w3resource (@w3resource) on CodePen.
Previous: Reactive Forms
Next:
Form Validation
