Testing
This guide offers tips and techniques for unit and integration testing Angular applications.
Setup and Configurations
The Angular CLI downloads and install everything you need to test an Angular application with the Jasmine test framework.
Any project created with the CLI is immediately ready to test. Just run the ng test CLI command:
```ng test```
TThe ng test command builds the app in watch mode, and launches the Karma test runner.
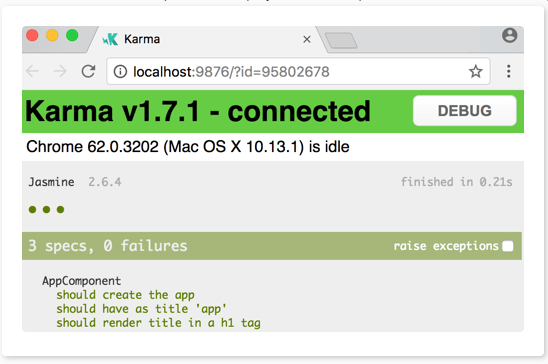
The console output looks a bit like this:
```
10% building modules 1/1 modules 0 active
...INFO [karma]: Karma v1.7.1 server started at http://0.0.0.0:9876/
...INFO [launcher]: Launching browser Chrome ...
...INFO [launcher]: Starting browser Chrome
...INFO [Chrome ...]: Connected on socket ...
Chrome ...: Executed 3 of 3 SUCCESS (0.135 secs / 0.205 secs)
```
The last line of the log is the most important. It shows that Karma ran three tests that all passed.
A chrome browser also opens and displays the test output in the "Jasmine HTML Reporter" as shown in the below code snippet.
Configuration
The CLI takes care of Jasmine and Karma configuration for us. We can fine-tune many options by editing the karma.conf.js and the test.ts files in the src/ folder.
The karma.conf.js file is a partial Karma configuration file. The CLI constructs the full runtime configuration in memory, based on application structure specified in the angular.json file, supplemented by karma.conf.js.
You can also unit test an Angular app with other testing libraries and test runners. Each library and runner have its own distinctive installation procedures, configuration, and syntax which will not be covered in this tutorial.
Enable code coverage reports
The CLI can run unit tests and create code coverage reports. Code coverage reports show you any parts of our code base that may not be properly tested by your unit tests. To generate a coverage report run the following command in the root of your project.
`ng test --no-watch --code-coverage
When the tests are complete, the command creates a new /coverage folder in the project. Open the index.html file to see a report with your source code and code coverage values.
If you want to create code-coverage reports every time you test, you can set the following option in the CLI configuration file, angular.json:
"test": {
  "options": {
    "codeCoverage": true
  }
}
Live Demo:
It is just a code snippet explaining a particular concept and may not have any output
See the Pen mYXoyY by w3resource (@w3resource) on CodePen.
Code coverage enforcement
The code coverage percentages let you estimate how much of your code is tested.
If your team decides on a set minimum amount to be unit tested, you can enforce this minimum with the Angular CLI.
For example, suppose you want the code base to have a minimum of 80% code coverage. To enable this, open the Karma test platform configuration file, karma.conf.js, and add the following in the coverageIstanbulReporter: key.
coverageIstanbulReporter: {
  reports: [ 'html', 'lcovonly' ],
  fixWebpackSourcePaths: true,
  thresholds: {
    statements: 80,
    lines: 80,
    branches: 80,
    functions: 80
  }
}
Live Demo:
It is just a code snippet explaining a particular concept and may not have any output
See the Pen yWvwYb by w3resource (@w3resource) on CodePen.
The thresholds property causes the tool to enforce a minimum of 80% code coverage when the unit tests are run in the project.
Service Tests
Services are often the easiest files to unit test. Here are some synchronous and asynchronous unit tests of the ValueService written without assistance from Angular testing utilities.
// Straight Jasmine testing without Angular's testing support
describe('ValueService', () => {
  let service: ValueService;
  beforeEach(() => { service = new ValueService(); });

  it('#getValue should return real value', () => {
    expect(service.getValue()).toBe('real value');
  });

  it('#getObservableValue should return value from observable',
    (done: DoneFn) => {
    service.getObservableValue().subscribe(value => {
      expect(value).toBe('observable value');
      done();
    });
  });

  it('#getPromiseValue should return value from a promise',
    (done: DoneFn) => {
    service.getPromiseValue().then(value => {
      expect(value).toBe('promise value');
      done();
    });
  });
});
Live Demo:
It is just a code snippet explaining a particular concept and may not have any output
See the Pen zQRbKW by w3resource (@w3resource) on CodePen.
Services with dependencies
Services often depend on other services that Angular injects into the constructor. In many cases, it's easy to create and inject these dependencies by hand while calling the service's constructor.
The MasterService is a simple example as illustrated in the code snippet:
@Injectable()
export class MasterService {
  constructor(private valueService: ValueService) { }
  getValue() { return this.valueService.getValue(); }
}
Live Demo:
It is just a code snippet explaining a particular concept and may not have any output
See the Pen byLZge by w3resource (@w3resource) on CodePen.
Component Test Basics
A component, unlike all other parts of an Angular application, combines an HTML template and a TypeScript class. The component truly is the template and the class working together. and to adequately test a component, you should test that they work together as intended.
Such tests require creating the component's host element in the browser DOM, as Angular does, and investigating the component class's interaction with the DOM as described by its template.
The Angular TestBed facilitates this kind of testing as you'll see in the sections below. But in many cases, testing the component class alone, without DOM involvement, can validate much of the component's behavior in an easier, more obvious way.
Component class testing
Test a component class on its own as you would test a service class. Consider this LightswitchComponent in the code snippet below which toggles a light on and off (represented by an on-screen message) when the user clicks the button.
@Component({
  selector: 'lightswitch-comp',
  template: `
    <button (click)="clicked()">Click me!</button>
    <span>{{message}}</span>`
})
export class LightswitchComponent {
  isOn = false;
  clicked() { this.isOn = !this.isOn; }
  get message() { return `The light is ${this.isOn ? 'On' : 'Off'}`; }
}
Live Demo:
It is just a code snippet explaining a particular concept and may not have any output
See the Pen ZNrPMo by w3resource (@w3resource) on CodePen.
You might decide only to test that the clicked() method toggles the light's on/off state and sets the message appropriately.
This component class has no dependencies. To test a service with no dependencies, you create it with new, poke at its API, and assert expectations on its public state. Do the same with the component class.
describe('LightswitchComp', () => {
  it('#clicked() should toggle #isOn', () => {
    const comp = new LightswitchComponent();
    expect(comp.isOn).toBe(false, 'off at first');
    comp.clicked();
    expect(comp.isOn).toBe(true, 'on after click');
    comp.clicked();
    expect(comp.isOn).toBe(false, 'off after second click');
  });

  it('#clicked() should set #message to "is on"', () => {
    const comp = new LightswitchComponent();
    expect(comp.message).toMatch(/is off/i, 'off at first');
    comp.clicked();
    expect(comp.message).toMatch(/is on/i, 'on after clicked');
  });
});
Live Demo:
It is just a code snippet explaining a particular concept and may not have any output
See the Pen mYXoQV by w3resource (@w3resource) on CodePen.
Component DOM testing
Testing the component class is as easy as testing a service. But a component is more than just its class. A component interacts with the DOM and with other components. The class-only tests can tell you about class behavior. They cannot tell you if the component is going to render properly, respond to user input and gestures, or integrate with its parent and child components.
None of the class-only tests above can answer key questions about how the components actually behave on screen.
- Is Lightswitch.clicked() bound to anything such that the user can invoke it?
- Is the Lightswitch.message displayed?
- Can the user actually select the hero displayed by DashboardHeroComponent?
- Is the hero name displayed as expected (that is, in uppercase)?
- Is the welcome message displayed by the template of WelcomeComponent?
These may not be troubling questions for the simple components illustrated above. But many components have complex interactions with the DOM elements described in their templates, causing HTML to appear and disappear as the component state changes.
To answer these kinds of questions, you have to create the DOM elements associated with the components, you must examine the DOM to confirm that component state displays properly at the appropriate times, and you must simulate user interaction with the screen to determine whether those interactions cause the component to behave as expected.
Previous: Angular Language Service
Next:
Angular versioning and releases